A practical guide to how a modern project actually lives
Before we start
When a front-end project grows beyond a handful of HTML, CSS and JavaScript files, tools start appearing: NPM, Vite, dependencies, scripts and build folders.
At first they can look like separate pieces. In reality they exist to make the project repeatable: you install the dependencies, start a local server, work on the sources and generate a final version ready to publish.
This guide stays deliberately practical: it doesn't try to explain the whole JavaScript ecosystem, but it gives you the minimum mental model so you don't get lost in front of the working tree, package.json, node_modules, src and dist.
1. Why NPM and Vite exist
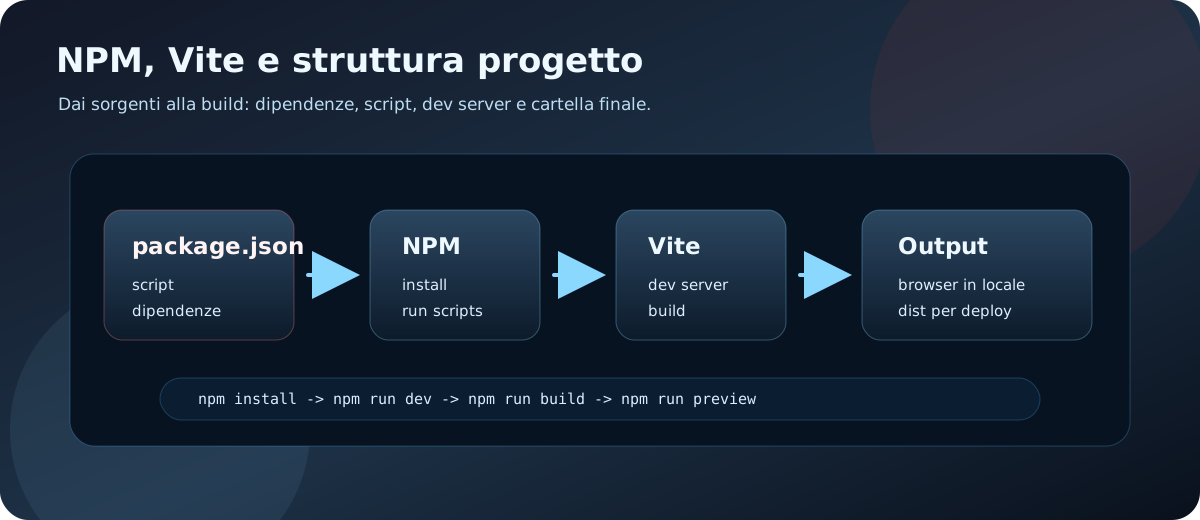
NPM is a package manager: it helps you install, update and record the libraries your project uses.
Vite, on the other hand, is a build tool and dev server: during development it serves files locally, refreshes the page quickly, and when needed generates the final folder for publishing.
In practice they work together:
- NPM reads
package.jsonand installs what is needed; - NPM scripts give you short, shared commands;
- Vite starts the local server or creates the final build;
- the output folder — usually
dist— is what ends up online.
The benefit isn't having more tools to complicate your life. It's having a predictable way to run the same project on several machines and in deployment.
2. Package managers and package.json
The package.json file is a kind of technical ID card for the project.
Inside you'll find things like the name, version, scripts and dependencies. You don't have to memorize it all, but you do need to know where to look when you want to work out how the project starts or builds.
{
  "scripts": {
    "dev": "vite",
    "build": "vite build",
    "preview": "vite preview"
  },
  "dependencies": {},
  "devDependencies": {
    "vite": "^8.0.7"
  }
}
The most useful part early on is scripts: it holds the project's official commands. Whether you work in a team or pick a project back up after months, it's the first place to check.
3. Scripts: the project's commands
Scripts are shared shortcuts. Instead of remembering every internal command, you use stable ones like these:
npm install
npm run dev
npm run build
npm run preview
npm installinstalls the dependencies the project declares;npm run devstarts the local development server;npm run buildgenerates the final version;npm run previewtries the produced build locally.
The distinction matters: dev is for while you work, build is for preparing the output, and preview is for checking that final output before deploying.
4. Dependencies, node_modules and the lockfile
A dependency is an external package the project uses: a library, a tool, a plugin or a framework.
When you run npm install, NPM downloads the packages into node_modules. That folder can get enormous and normally should not be committed to Git.
The files that do belong in the repository are:
package.json, because it declares what the project needs;package-lock.json, because it pins exact versions and makes installs more repeatable;.gitignore, because it keeps generated folders likenode_modulesanddistout of version control.
When you clone a project from scratch you don't copy node_modules: you reinstall the dependencies with npm install.
5. The working tree and project structure
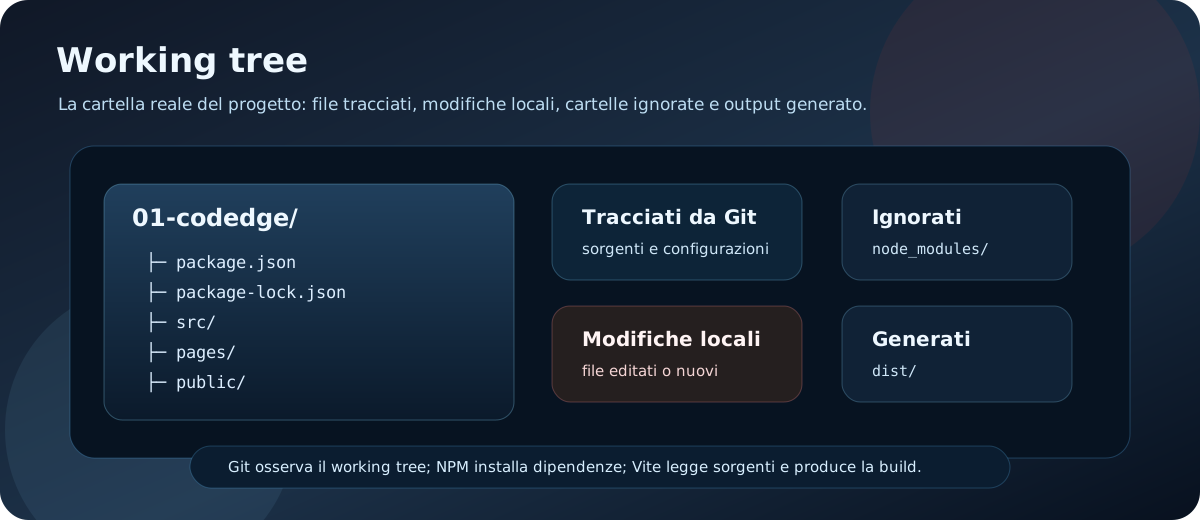
The working tree is the project's working folder on your computer. It's the concrete place where you see files, folders, local changes, installed dependencies and generated output.
When you open a project in VS Code, what you're looking at is the working tree. When Git tells you that you have modified, untracked or clean files, it's reading the state of this folder against the last commit.
Several different things live side by side in the working tree:
- files tracked by Git, such as
package.json,src,pagesand configuration; - files you've modified but not yet committed;
- untracked files, just created and not yet added to Git;
- ignored folders, like
node_modules, needed locally but not in the repository; - generated output, like
dist, which comes from the build and shouldn't be edited by hand.
Understanding this distinction avoids a lot of confusion: not everything you see in the folder plays the same role, and not everything should be committed.
Every project can organize itself differently, but some folders come up again and again.
src- holds the sources: CSS, JS, components, images imported from code and the app's logic.
public- holds files served exactly as they are: favicon, manifest, static images or assets that don't go through the bundler.
pages- in this project, holds the source HTML pages Vite uses as entry points.
dist- is the output the build generates. You check it, but you don't normally edit it by hand.
The mental rule is simple: work on the sources, let the tools generate the output, and publish what the build produces.
6. Local builds with Vite
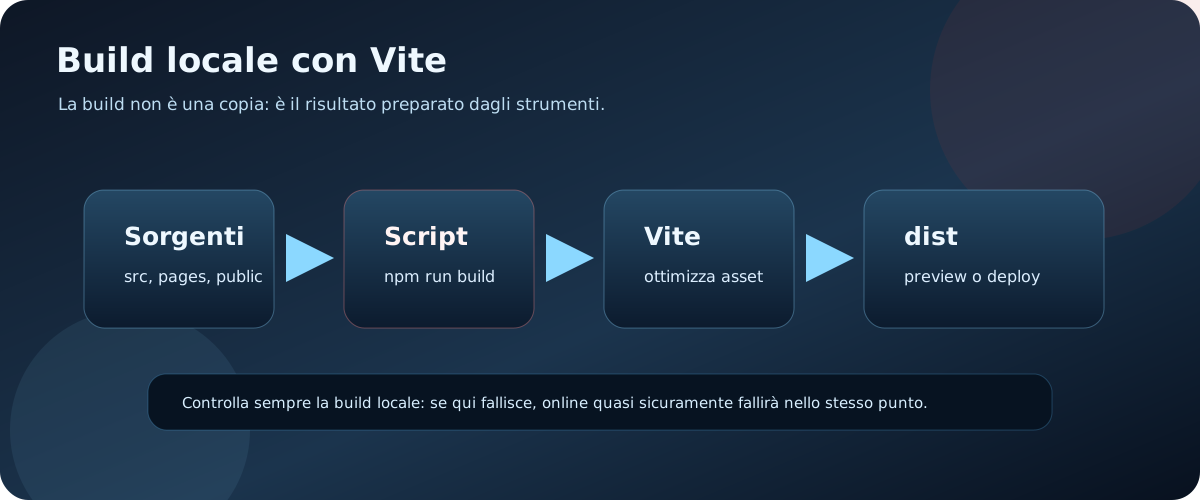
During development you use the local server. It's fast, convenient and built for working.
The build is a different step: Vite takes the sources, resolves imports, optimizes assets and generates the final files. In most projects those files land in dist.
That's why it's worth running at least one local build before publishing:
npm run build
npm run preview
If the build fails locally, it will very likely fail on the hosting service too. Better to find out first, when you can read the error calmly and fix it.
7. A minimum working routine
When you open or return to an NPM/Vite project, you can follow this routine:
- check
package.jsonto see which scripts are available; - run
npm installif the dependencies aren't installed; - start
npm run devto work locally; - edit the sources, not the generated output;
- run
npm run buildbefore deploying; - if it's available, use
npm run previewto check the final build.
This routine saves you from a lot of false problems: missing dependencies, the wrong script, stale output or generated folders edited by hand.
8. Common mistakes
When something breaks, the problem usually falls into a handful of recurring cases.
npm installwasn't run after a clone, a pull or a branch switch.- You're using a script that doesn't exist in
package.json. - A dependency is in
devDependenciesbut is being used as if it were a runtime one. - You edited
distinstead of the source files. - The build works in dev but fails because a path, import or asset is wrong.
- The deployment provider uses a different Node version from your local one.
The first step isn't to change everything. Read the error message, look at which command was running, and go back to the file that defines it.
9. Where to go from here
Once you understand NPM, Vite and project structure, much of the workflow becomes less mysterious: why dependencies exist, what a build does, what goes online and what stays in development only.
From here you can connect the other guides more easily:
- VS Code essentials: to use the integrated terminal, tasks and debugging more methodically.
- Browsers and DevTools: to check what actually reaches the browser.
- Deployment basics: to understand how the build gets published online.
- Git without panic: to save changes and roll back without the anxiety.
10. Quick reference (cheat sheet)
Here is the quick reference table for managing NPM packages and Vite commands:
| Command | Dependency type | Main purpose |
|---|---|---|
| npm init -y | General | Initializes a new empty package.json with the default options. |
| npm install <pkg> | dependencies | Installs a package the site needs at runtime (lodash, for example). |
| npm install -D <pkg> | devDependencies | Installs packages needed only during development or build (Vite, Prettier). |
| npm run dev | Script | Starts the local development server with very fast rendering. |
| npm run build | Script | Compiles and optimizes the assets, creating the production 'dist/' folder. |
11. Practical challenge: put yourself to the test
Create your first terminal-driven project using NPM:
Create a package.json, install a code formatter as a devDependency and write a custom script to run it from the terminal.
Step-by-step instructions:- Open a terminal in an empty folder and run
npm init -yto create the default package.json. - Install the *Prettier* library as a development dependency by running:
npm install -D prettier. - Open
package.jsonin VS Code and add the custom script"format": "prettier --write ."inside the"scripts"block. - Create a messy test file and run the automatic formatting from your terminal with
npm run format.
12. Check what you have learned (quiz)
Test what you have learned in this guide with a quick 10-question multiple-choice quiz.