The essential guide for starting from scratch
1. Before we start, and where Git came from
Before we really start
This guide is written for anyone starting from scratch who wants to begin using Git straight away — simply, practically, and without being crushed by overly technical explanations.
The goal is not to turn you into an expert in a few days. It is far more concrete: to understand how Git works, start genuinely using it on a project, avoid the most common mistakes and build a tidier way of working from the outset.
Here you will find the fundamental concepts, the commands that are genuinely useful at the beginning, and a short practical path for getting comfortable with Git without panic.
To understand Git more deeply there are fuller books, official documentation and plenty of other good tools. But above all one thing is needed: practice in the field. You really understand Git when you use it, get it wrong, check, fix and try again.
If this guide takes you from a mess of scattered files to a clearer, more deliberate way of working, it will have done its job.
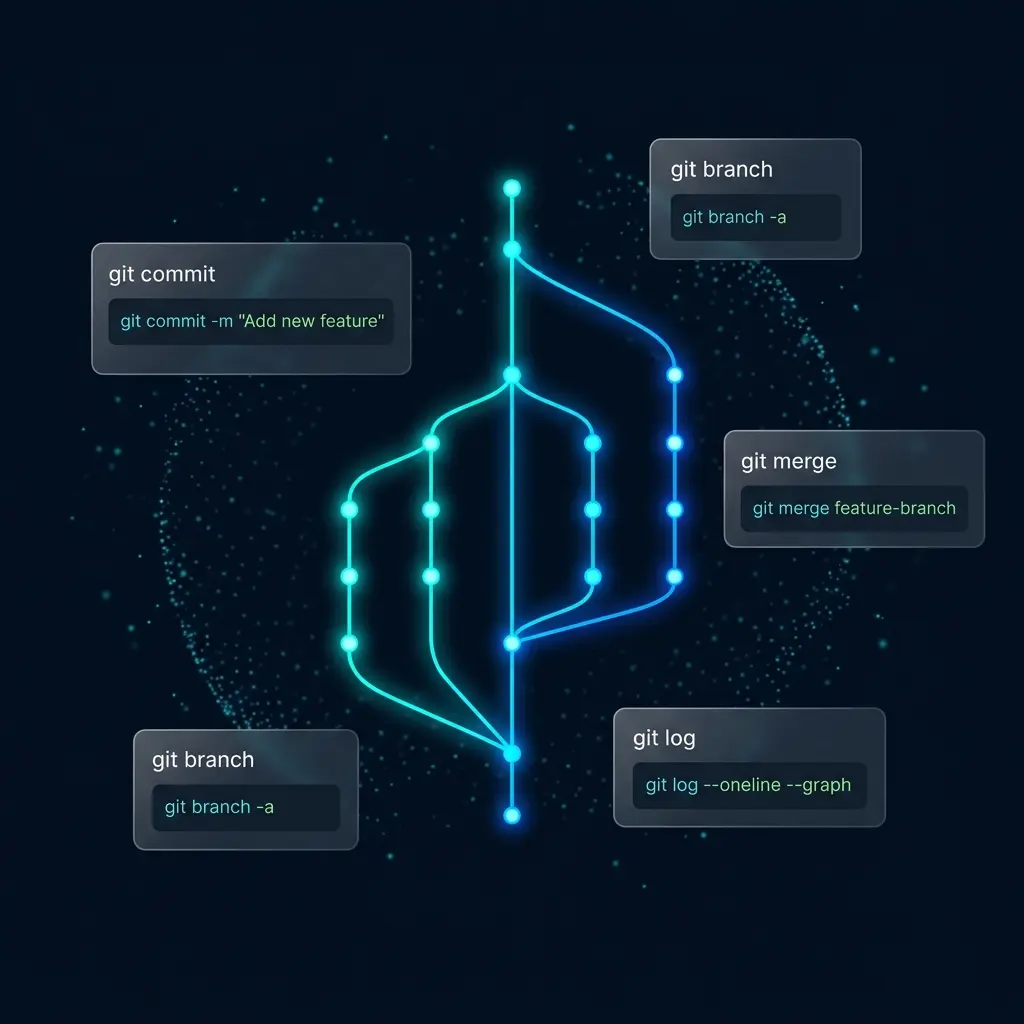
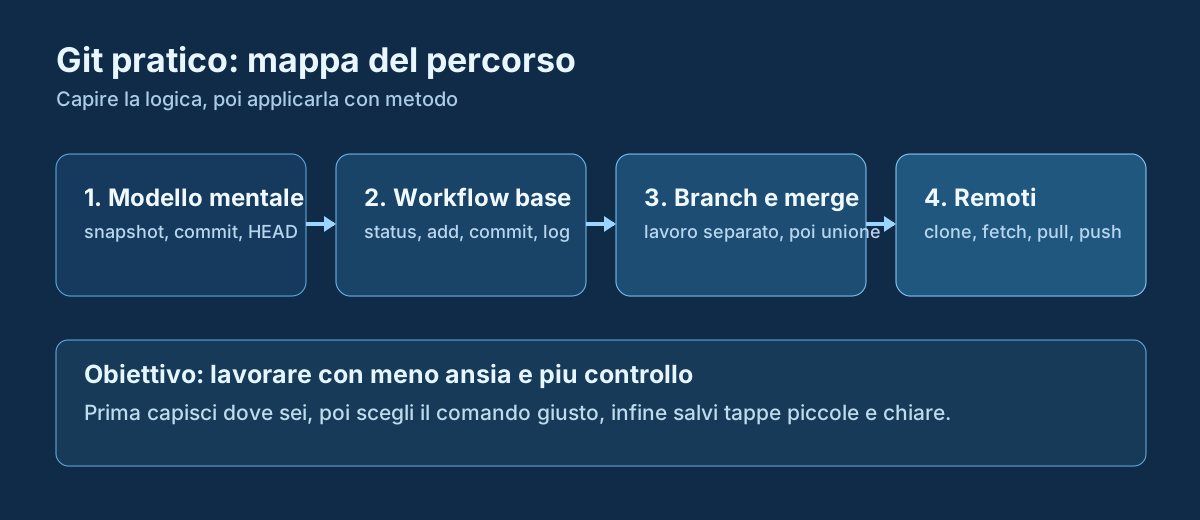
Where Git comes from
Git was born in 2005, during the development of the Linux kernel.
The Linux project was enormous, distributed, and subject to a huge volume of continuous changes. It needed a fast, reliable, robust system for managing the work.
Linus Torvalds, the creator of the Linux kernel, built Git with a few very clear goals:
- speed;
- data integrity;
- the ability to work well even on very large projects;
- reliability.
That origin explains something important: Git was not designed to coddle beginners. It was designed to hold up under serious work.
Which is why it can feel a little rough at first. Not because it is badly made, but because it was designed around very practical priorities.
The good news is that you do not need to know every corner of Git to use it well. You just need a good mental model and a firm grasp of the essential core.
Today Git is the de facto standard in version control. It is used by freelancers, teams, startups, large companies and gigantic open source projects.
Learning it is not time wasted on a niche tool. It is a central skill in development work.
2. Why Git and GitHub
Why Git changes the way you work
Git is a system that tracks the changes made to a project's files over time.
Put like that it sounds like a textbook definition. In practice it means this: Git helps you work without losing your way.
When you do not use Git, the same scene tends to play out. You create a project folder, then a copy called project-final, then a second one called project-final-real, then perhaps project-final-real-definitive. A few days later you no longer know which version is the right one. If something breaks, you have no idea when it happened. If you want to go back, you improvise.
Git exists precisely to avoid that mess.
With Git a project is no longer a confused mass of files. It becomes a story made of stages. Every important stage can be saved with a commit. Every commit carries a message explaining what you did. That way you are no longer working blind: you are building a readable history.
Git is useful even when you work alone. In fact it is often at its most useful for solo work early on, because while you are learning you experiment a lot, get things wrong, change your mind, fix, break, rebuild. Having a tool that lets you save sensible checkpoints and get back to a stable state is an enormous help.
Git gives you three things above all:
- safety, because you can recover far more often than you would think;
- order, because changes are recorded meaningfully;
- freedom, because you can experiment without the constant fear of destroying everything.
The important thing to grasp right away is this: Git is not just a collection of commands. It is a way of thinking about a project over time.
Git and GitHub are not the same thing
This is one of the most common points of confusion.
Git and GitHub are not the same thing.
Git is the program that runs on your computer and manages the project's history.
GitHub is an online platform that hosts Git repositories and adds features such as sharing, remote backup, collaboration, pull requests and public visibility.
A simple metaphor might be this:
Git
Git is the engine.
GitHub
GitHub is the garage online.
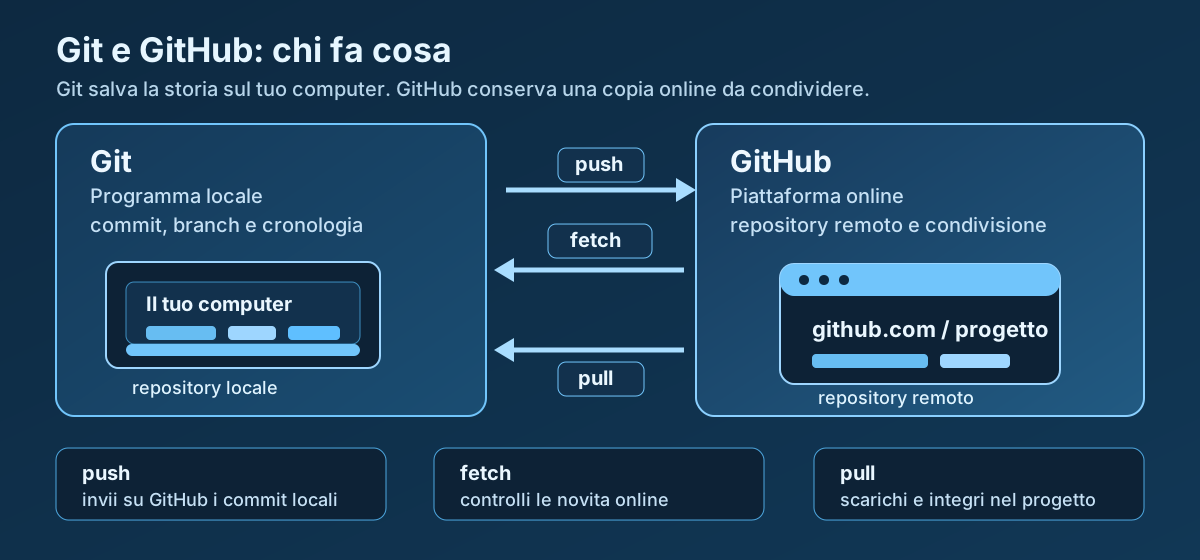
With Git you can initialise a repository, create commits, make branches, merge and browse the project's history without any internet connection.
With GitHub you can publish that history online, keep a remote copy, collaborate with other people and use the repository as a portfolio too.
This distinction matters because it also helps you understand problems better.
If the problem is about commits, history, branches or local files, you are talking about Git.
If it is about syncing, push, pull, the remote repository or permissions, you are probably talking about GitHub, or at least a similar remote platform.
At the beginning the best approach is this: learn Git properly first, and GitHub becomes far simpler afterwards. When you want to move to the online side, carry on with the GitHub in practice guide.
3. The mental model and the working areas
The right mental model: snapshot, commit, hash and HEAD
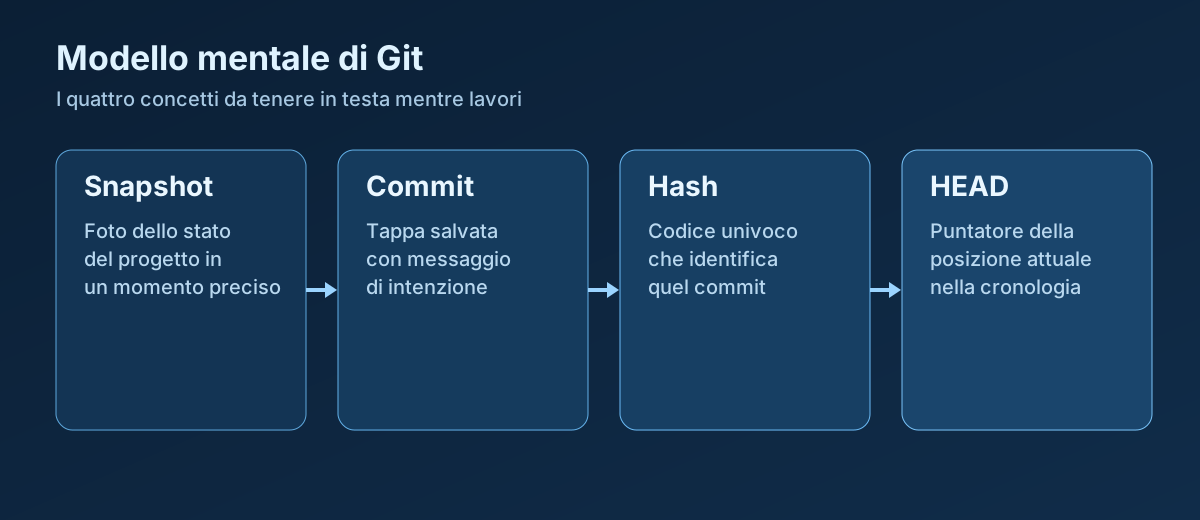
To understand Git well, you first need to understand four key words.
Snapshot
Git thinks in snapshots.
Put as simply as possible: a snapshot is the content of the files at a given moment.
In practice it answers one question: right now, at this instant, what does the project look like?
If at that moment index.html contains a new hero, style.css has different padding and main.js is unchanged, the snapshot is exactly that state of the files.
Commit
A commit is the historical event that saves that snapshot into Git's history.
So snapshots and commits are connected, but they are not the same thing.
The snapshot is the content. The commit is the official saving of that content into the project's story, with a message, an author, a date and a hash.
When you make a commit, Git takes the state you prepared in staging and records it as a new stage in the history.
For example:
- Add the services section to the home page
- Fix the mobile menu
- Improve the hero layout on mobile
The practical distinction is this:
- snapshot = the content of the files;
- commit = the historical event that saves that content.
And here is the part that confuses almost everyone at the start: you hardly ever touch a snapshot as a separate object.
In practice, what you touch is the files, the staging area and the commits.
For example:
- you edit files in the working tree;
- you stage what you want to save;
- you commit to record that state in the history.
In tools like VS Code, the coloured lines and the letters next to files are not the snapshot: they are how the editor shows you the differences and the state of your changes.
If you make small, clear commits, the story becomes readable.
Hash
Every commit has a unique identifier called a hash.
You do not need to memorise it. It is enough to know that Git uses this code to refer precisely to a specific commit.
HEAD
HEAD is a pointer. In plain terms, it says where you are right now in the history.
If you are on the latest commit of the main branch, HEAD points there.
If you make a new commit, HEAD moves forward.
If you switch branch, HEAD follows the branch you are on.
A simple recap
- snapshot = the content of the files photographed at that moment;
- commit = the historical save that records that snapshot;
- hash = the commit's identifier;
- HEAD = where you are right now.
Once these concepts start to click, Git stops feeling like black magic.
Working tree, staging area and repository
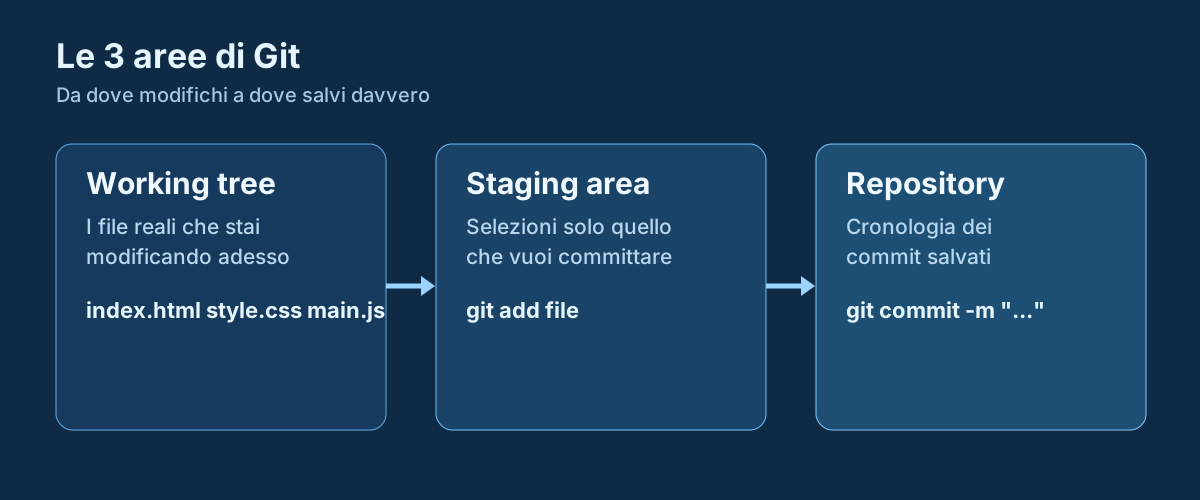
One of the most important things for a beginner is understanding that Git has three zones.
Working tree
The working tree is your actual working folder. It is where you edit the files.
For example:
- index.html
- style.css
- main.js
Staging area
The staging area is an intermediate zone.
Here you prepare the changes you want to put into the next commit.
It is like a tray where you place only the things ready to be shipped.
Repository
The repository is the actual history of the commits already saved.
Why the staging area matters
At first it can seem like a pointless complication. In reality it is one of Git's superpowers.
It lets you decide precisely what goes into the next commit.
A very realistic example:
You edited style.css to sort out the hero. You also touched main.js, but there you are still trying something that does not quite work.
With Git you can stage only style.css and make a clean commit about the layout. main.js stays out until it is ready.
That lets you make clearer commits and produces a much more readable history.
A useful mental image
Think of it this way:
- working tree = your desk;
- staging area = the tray before shipping;
- repository = the archive.
If that image sticks, half the initial confusion disappears.
4. Initial setup and your first repository
Installing and configuring Git
Installing Git today is fairly simple.
On Windows you can use Git for Windows.
On macOS you can use Homebrew or Apple's tools.
On Linux you will almost always find it in your distribution's repositories.
The first thing to do after installing is to check that Git works.
git --versionThen it is worth setting at least your name and email, because Git uses them in commits.
git config --global user.name "Your Name"
git config --global user.email "you@example.com"
git config --global init.defaultBranch main
If you use Visual Studio Code, setting it as the default editor can be handy too:
git config --global core.editor "code --wait"To see the current configuration:
git config --listThis stage is simple but important. Better to do it now than to reach your first commit and find Git complaining that your name and email are missing.
Your first repository from scratch
Here is where it really begins.
Imagine you have a folder with a small project, perhaps a static site.
You go into the folder and initialise Git.
cd my-project
git init
From that moment the folder is no longer just a folder. It has become a Git repository.
Straight afterwards it is worth checking the status:
git status
This is one of the most important commands there is. It tells you:
- which branch you are on;
- which files are new;
- which have been modified;
- which are ready to commit.
Then you can add the files and make your first commit:
git add .
git commit -m "First commit: initial project structure"
What you actually did
You did four fundamental things:
- you created a local repository;
- you checked the project's initial state;
- you staged the current version of the files you want to save;
- you created the first commit, which records the project's first snapshot in the history.
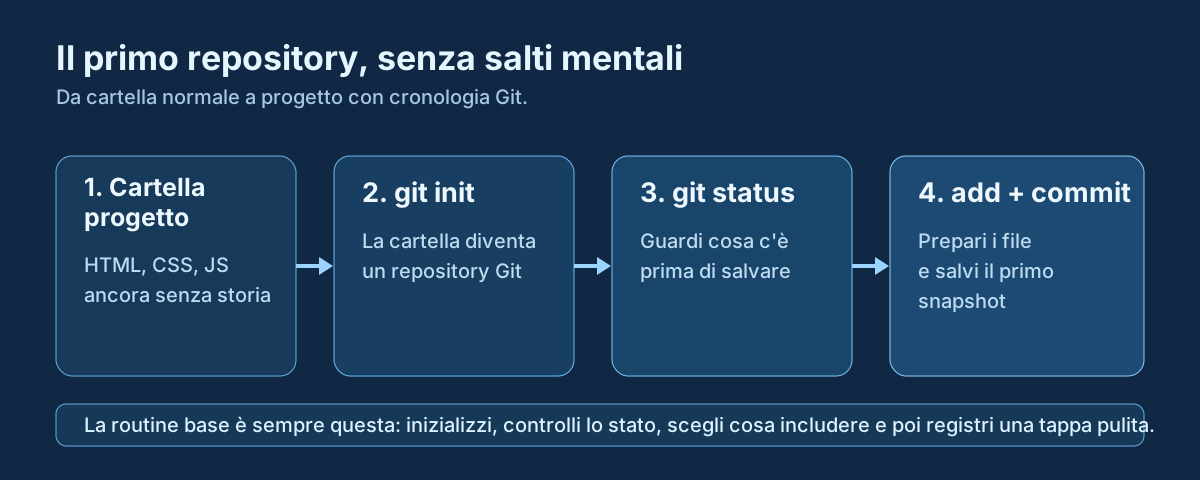
Understand this step well, because you will repeat it on every future project.
5. The daily workflow and clean commits
The practical flow for making a clean commit
Most day-to-day work with Git revolves around a handful of commands.
Learn these well and you already have the heart of practical use.
git status
It shows you the current situation.
It is the command that stops you working blindfolded.
Use it often.
git diff
git diffIt shows you the lines that changed in files not yet staged. It is the most practical check before deciding what goes into the commit.
git add
git add style.cssIt stages the current version of the files you want to include in the next commit.
You can use it on specific files or, when that makes sense, on the whole project.
git add .But be careful: git add . is not pure evil, yet using it every time without thinking can mix together changes that would be better kept apart.
git commit
git commit -m "Improve the hero's mobile layout"It creates a commit in the history using what you prepared in staging.
In other words: it takes the staged state of the files, records a snapshot of it and saves it as a new stage in the story.
git log, when you need to reconstruct the story
git log --oneline --graph --decorate --allIt is not a required step after every commit. It is useful when you want to see how the project evolved or track down a specific stage.
The right mental flow
Before you add, ask yourself: which changes do I really want to save in this commit?
Before you commit, ask yourself: does the message tell one clear thing?
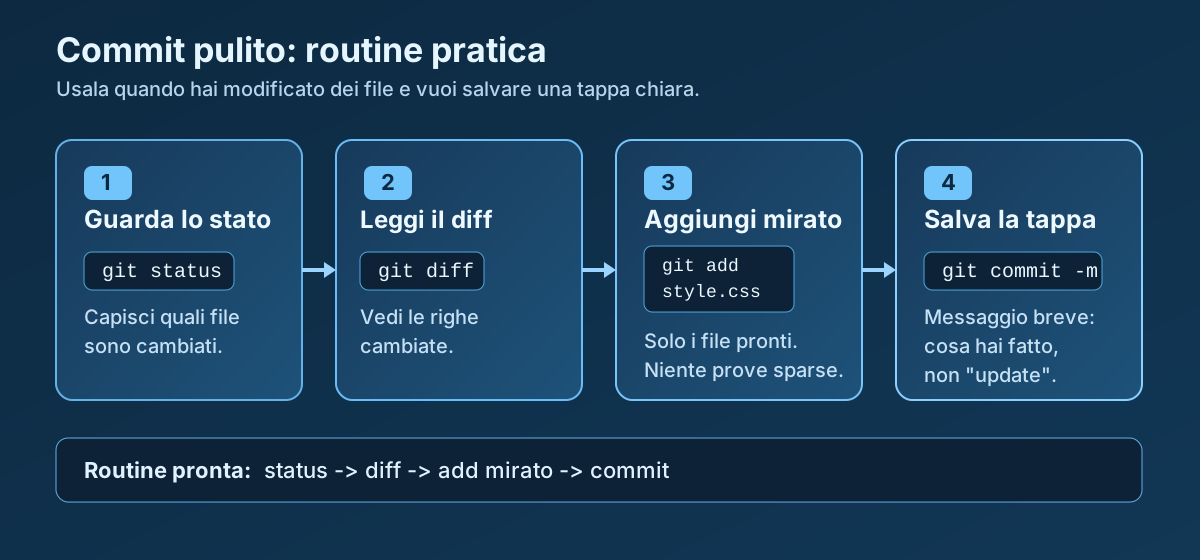
This small habit makes an enormous difference to the quality of the work.
How to write commit messages that make sense
A commit message is the label on the stage you are adding to the history.
If the message is clear, future you will immediately understand what you did. If it is vague, the history turns into a swamp.
Good messages
- Add the services section to the home page
- Fix the mobile menu bug
- Improve button contrast in the footer
- Reorganise the navbar files
Weak messages
- update
- fix
- various things
- attempt
- dunno
A practical rule
A commit should tell one single intention.
If describing it makes you want to say “I did a bit of everything”, you have probably piled up too many changes at once.
Smaller, clearer commits almost always beat huge, muddled ones.
.gitignore, properly explained
.gitignore is the file where you tell Git which files or folders to ignore.
Not everything belongs in the history.
In a typical front-end project it is usually worth ignoring things like:
node_modules/
dist/
.env
.DS_Store
Thumbs.db
.vscode/
Why it matters
A good .gitignore:
- keeps the history clean;
- avoids pointless noise;
- reduces risk;
- stops you accidentally versioning sensitive files.
An important caveat
If a file is already tracked, adding it to .gitignore afterwards is not enough to make it disappear from the repository.
In that case you first have to remove it from the index:
git rm --cached filenameThen you commit.
This point confuses an awful lot of beginners.
6. Branches, merges and remotes
Branches: what they really are
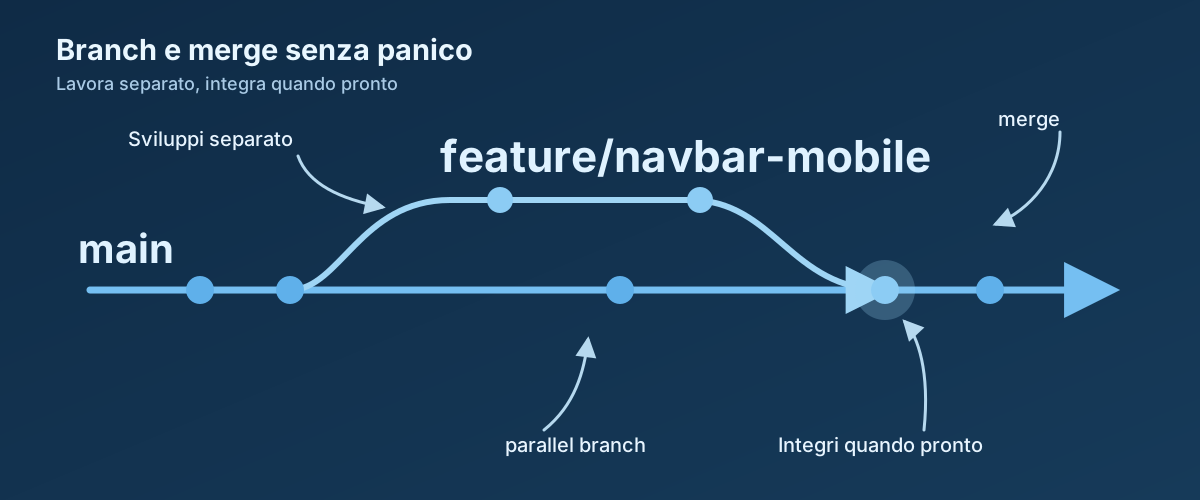
A branch is a separate line of work.
It lets you develop a change without immediately messing up the main branch, which is usually called main.
For example, if you want to try a new mobile navbar, instead of working directly on main you can create a dedicated branch.
git switch -c feature/navbar-mobileFrom then on you work in there.
Why they matter
Branches let you:
- experiment without chaos;
- separate work more clearly;
- keep main tidier;
- merge the result only once it is ready.
Useful branch names
feature/navbar-mobilefix/footer-linkrefactor/cards-layoutdocs/setup-guide
Avoid confusing names like test, test2, new, dunno.
Something useful to know
Branches are not heavy copies of the project. They are clever pointers into the history. That is why creating them is cheap and perfectly normal.
Merges and conflicts without panic
When you have finished working on a branch, you can merge it into main.
This is called a merge.
git switch main
git merge feature/navbar-mobile
If Git can combine everything on its own, the merge goes through quietly.
If instead two lines of work changed the same part of the same file in incompatible ways, you get a conflict.
A conflict is not a disaster
A conflict is not Git breaking.
It is Git telling you:
I cannot decide this on my own. Tell me which version to keep.
In the file you will see markers like this:
<<<<<<< HEAD
<nav class="main-nav dark">
=======
<nav class="main-nav glass">
>>>>>>> feature/header-style
You have to read them, understand the two versions and choose which to keep, or combine them by hand.
Then you save the file, add it again and complete the process:
git add index.html
git commit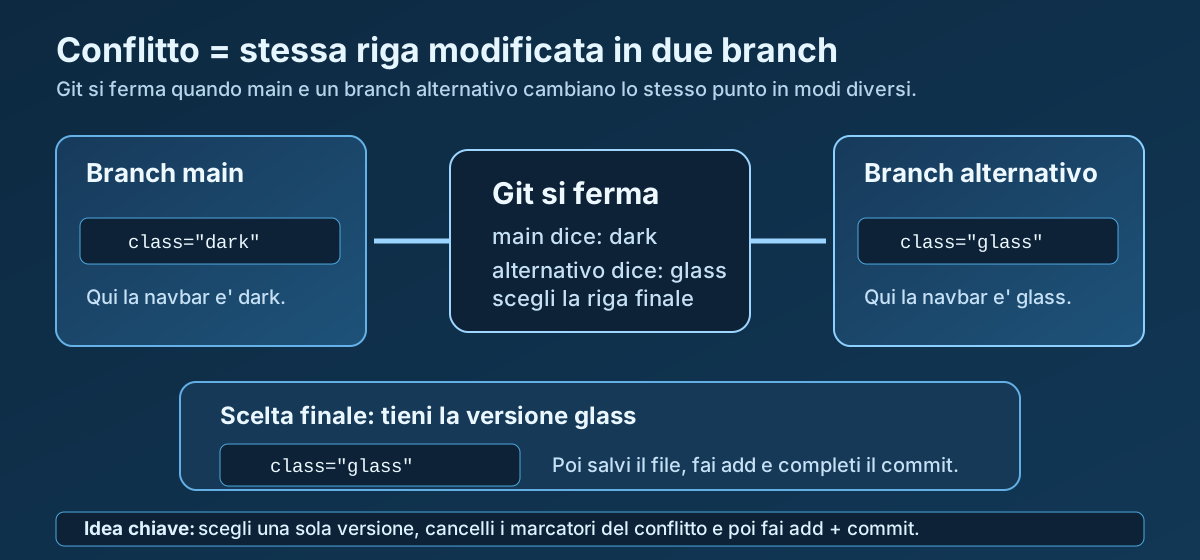
Remotes: clone, fetch, pull and push
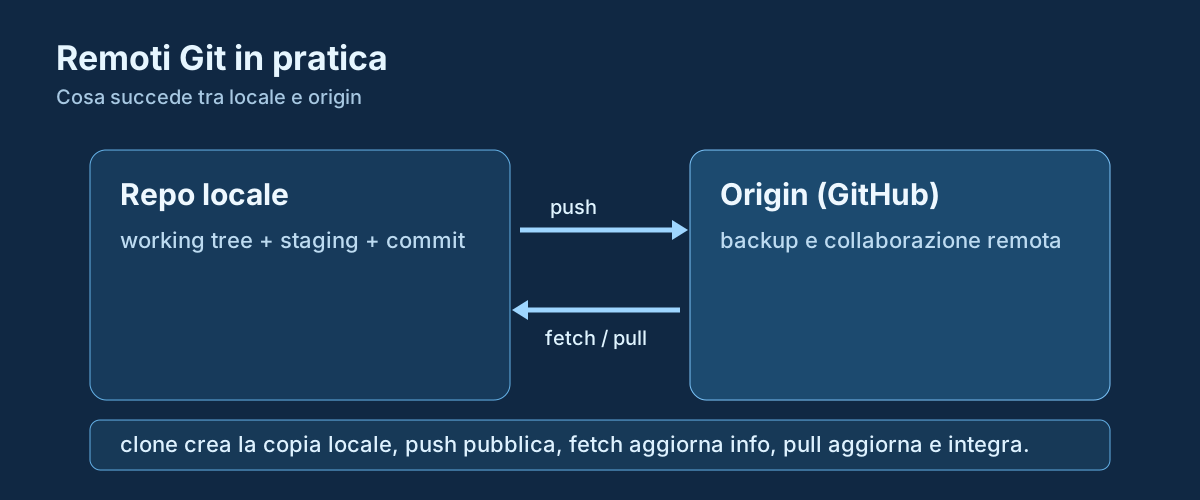
A remote is a copy of the repository hosted elsewhere, on GitHub for instance.
The conventional name for the main remote is usually origin.
Connecting a local repository to GitHub
git remote add origin https://github.com/yourname/repo-name.git
git remote -v
git push -u origin main
The four verbs worth understanding
clone
git clone https://github.com/user/project.gitDownloads an existing remote repository to your machine.
fetch
git fetch originUpdates the information from the remote, without automatically integrating it into the current branch.
Very useful, because it lets you look first and decide afterwards.
pull
git pull origin mainDownloads and integrates into the current branch.
In the most common configuration it is equivalent to fetch plus merge. In some workflows it may integrate using rebase, so it is worth knowing how your environment is set up.
push
git push origin mainPublishes the commits you made locally to the remote.
A practical tip
Early on, do not treat pull as an automatic button pressed with your eyes shut. Better to understand what you are doing. Sometimes fetching before integrating gives you more control and less anxiety.
7. Recovering from mistakes, and the reflog
Going back: restore, reset and revert
This is one of the areas that frightens beginners most.
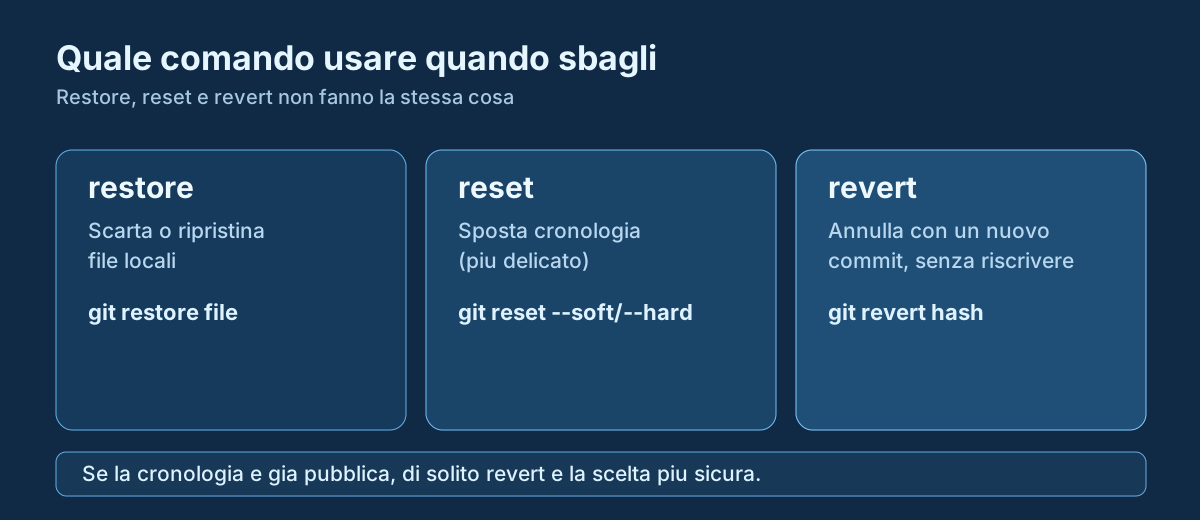
In reality you just need to understand that these three commands do different things.
restore
Mainly used to discard local changes or restore a file.
git restore style.cssIf you have made a mess of a file and want to undo local changes that are not yet committed, restore is often the simplest choice.
By default git restore style.css returns the file to the state currently recorded in the index. If you have nothing staged, for a beginner that usually coincides with the last commit. If you want to be explicit, you can also name the source:
git restore --source=HEAD -- style.cssreset
reset is more powerful and more delicate.
It can move the history pointer and, depending on the option used, affect the staging area and the working tree.
git reset --soft HEAD~1
git reset --hard HEAD~1--softsteps back in the history but keeps the changes in staging;--hardrealigns history, staging and working tree drastically, and can wipe out unsaved changes.
So: useful, but to be used with your brain switched on.
revert
revert is different.
It does not delete a commit from the history. It creates a new commit that undoes the effect of the chosen one.
git revert abc1234Which is why it is often the safest choice once the history has already been published.
A quick mental model
- restore = discard or restore files;
- reset = reposition the history;
- revert = undo a commit without rewriting the past.
The reflog: the hidden parachute
git reflog is one of Git's most reassuring commands.
It records the movements of HEAD and other references. In practice it helps you find points in the history that looked lost.
Plenty of times when someone says “I've lost everything”, Git answers: “maybe not”.
Example
git reflog
git reset --hard HEAD@{2}
With reflog you look at recent movements. Then you can decide to go back to an earlier point.
It is not eternal magic and it does not replace common sense, but knowing it exists completely changes your psychological relationship with Git.
Classic beginner mistakes
People starting out with Git tend to trip over the same things.
- Making giant commits. If you put HTML, CSS, JavaScript, images, experiments and unrelated changes into one commit, understanding or fixing it later becomes far harder.
- Using vague messages. update tells you nothing.
- Always working on main. For small changes it happens, but as a general rule sensible branches are much better.
- Forgetting .gitignore. Then you end up tracking useless or sensitive material.
- Using pull without understanding it. Better to know, at least roughly, what is coming into your project.
- Reaching for reset --hard casually. That command is not a sweet.
- Panicking at a conflict. A conflict is not the end of the world. It is a manual choice Git is asking you to make.
- Not checking status. git status is your dashboard. Ignore it and you are working half-blindfolded.
8. Guided lab
A short guided lab
Let's walk through a small, realistic path.
Imagine you have a folder with these files:
- index.html
- style.css
- main.js
- images/
Step 1: initialise Git
cd showcase-site
git init
git status
Step 2: create a .gitignore if you need one
For instance, if this is a project with a build or dependencies:
node_modules/
dist/
.env
Step 3: first commit
git add .
git commit -m "First commit: initial site structure"
Step 4: make one focused change
Imagine improving the hero title and the navbar's padding.
Check what changed:
git status
git diff
If it all hangs together:
git add index.html style.css
git commit -m "Update the hero and improve navbar spacing"
Step 5: create a branch for a new feature
git switch -c feature/testimonialsAdd a new section and make a dedicated commit:
git add index.html
git commit -m "Add testimonials section markup"
Then perhaps add the styling:
git add style.css
git commit -m "Add responsive styling for testimonials"
Step 6: go back to main and merge
git switch main
git merge feature/testimonials
Step 7: connect GitHub and push
git remote add origin https://github.com/user/showcase-site.git
git push -u origin main
What you actually did
You have already used the practical heart of Git:
- init;
- status;
- add;
- commit;
- branch;
- merge;
- push.
Run through this lab two or three times on small projects and you will genuinely start to feel less lost.
9. Checklist and glossary
A survival checklist
Before committing
- I know which changes I actually want to save.
- This commit tells one single intention.
- The message is clear.
- I am not including useless or sensitive files.
- I checked git status or git diff.
Before pushing
- I am working on the right branch.
- The history makes sense.
- I am not accidentally publishing something broken.
- I know what I am sending to the remote.
When something goes wrong
- I do not panic.
- I read git status.
- I work out where I am: working tree, staging, repository or remote.
- If I am afraid of losing something, I check the reflog.
- If the history is already public, I consider revert before doing worse damage.
Essential glossary
- Repository
- the project together with its Git history.
- Commit
- a stage saved in the story.
- Branch
- a separate line of development.
- Merge
- the joining of two lines of work.
- Remote
- a copy of the repository hosted elsewhere.
- Origin
- the conventional name for the main remote.
- HEAD
- a pointer to your current position in the history.
- Hash
- a commit's unique identifier.
- Staging area
- the intermediate zone between local changes and a commit.
- Working tree
- the real files you are working on.
10. Git + AI as an assistant
A practical method: deliberate manual work + AI as an assistant
The point is not to hand everything over to the AI. The point is to use the AI as an operational copilot while you keep hold of the direction: the commit's intention, its boundaries, the risks, the logical order.
A simple rule: ask for analysis and a proposal first, then approve the action. That way you avoid dirty commits, impulsive pushes and painful corrections.
An operational split: what you do and what you delegate
You decide
- The goal of the work (what you actually want to deliver).
- The commit's scope (which files are in and which are out).
- When to push (only after checking the risks).
The AI is good at
- Reading the state and summarising the context.
- Preparing selective staging and a readable diff.
- Walking you through conflicts and a pre-push checklist.
A full workflow on a real project
- Set the project up: initialise and check the starting state.
Initialise the Git repository in this folder, set up main if needed and briefly explain what you did. - Separate the work by topic: understand first, touch staging afterwards.
Analyse the changes and split them into blocks: guide content, styling, scripts, other. - Prepare a clean commit: one intention, no noise.
Prepare a commit containing only the files related to the Git guide, leave the rest out, then show me the staged files, the staged diff and the commit message you propose. - Handle conflicts safely: never take destructive shortcuts.
Walk me through resolving the conflicts while keeping the useful parts. Do not use reset --hard or any destructive command. - Run a quality gate before pushing: only if everything hangs together.
Before pushing, run a risk checklist: correct branch, sensible commits, clean diff, no sensitive files, clean working tree. Show me the summary and wait for confirmation before going ahead.
A concrete example: from manual to AI-assisted
The classic manual flow: git status -> git add -p -> git diff --staged -> git commit -> git push.
The assisted version: ask for the same flow in plain language, but always impose clear constraints on scope and safety.
Practical prompts you can use straight away
Check the project's Git status and summarise it in three lines.Prepare a commit with only the Git guide's files, leave everything else out and show me the diff.Walk me through resolving this conflict without using destructive commands.Before pushing, give me a risk checklist, show me what you are about to send and wait for my confirmation.The golden rule: delegate speed and repetition, not understanding. As long as you keep steering the logic, the AI makes you work better rather than at random.
11. Final note
Final note
Having got this far, you have not seen all of Git, and that is fine.
You have seen the part that is most useful for genuinely getting started: understanding Git's logic, using the basic flow, making cleaner commits, working more tidily, avoiding some classic mistakes and recovering more calmly when something goes wrong.
To go deeper there are topics only touched on here or left out entirely, such as rebase, stash, cherry-pick, tags, advanced pull requests and other more specialised tools. They are useful, but you do not need them to take your first steps solidly.
The truth is simple: you do not learn Git by reading about it once. You learn it by using it. The more small experiments you run on real projects, the more natural the concepts will feel. And the more the commands will stop looking like black magic and start becoming ordinary working tools.
You do not need to know everything straight away. You need to start well. And starting well, with Git, means less confusion, less panic and far more control over what you are building.
That is exactly what this guide is for: to give you a practical, clear, human foundation to work from.
The next step now is not to reread all of this ten times. It is to open a project, initialise Git and start actually using it.
Related guides
- GitHub in practice: remote repositories, push/pull, pull requests, issues and a collaborative workflow.
- All tutorials: an up-to-date list of the available guides.
12. Quick reference (cheat sheet)
Here are the fundamental local Git commands worth keeping in mind:
| Command | What it does | When to use it |
|---|---|---|
| git init | Initialises a new local Git repository. | At the start of a new project you want to track. |
| git status | Shows the current state of the working directory and the staging area. | Constantly, before every add or commit. |
| git add . | Moves all current changes into the staging area. | When the changes are ready to be committed. |
| git commit -m "msg" | Permanently saves the staged snapshot into the history. | After adding your files to the staging area. |
13. Practical challenge: put yourself to the test
Open your terminal and run through the steps for building a clean workflow:
Create a local Git repository, create a parallel development branch and make one clean commit of a new file.
Step-by-step instructions:- Open your project folder in the integrated terminal and type
git init. - Create a new development branch with
git checkout -b feature/challenge-test. - Create a text file called
challenge.txtand write "Challenge complete" inside it. - Type
git status, then stage the file withgit add challenge.txtand commit it with a clear, specific message.
14. Check what you have learned (quiz)
Test what you have learned in this guide with a quick 10-question multiple-choice quiz.