HTML structure for beginners
Before we start
Every single web page you visit, from Wikipedia to a complex application, rests on an invisible skeleton: HTML. Before you think about colours, animation or dynamic features, it is this load-bearing structure that arranges the information logically.
For that reason, rather than memorising dozens of tags, we will concentrate on how a page is structured. Writing clean, tidy code is not about looking good: it is what makes a site usable by everyone and easy to find in search engines. Here we cover the basics you need to start, but the real progress comes with practice: experiment and write your own code from day one, one step at a time.

1. How HTML thinks (and what it is not)
Let's start with something fundamental: HTML is not a programming language. It performs no calculations, makes no logical decisions and cannot do arithmetic. HTML stands for HyperText Markup Language.
Its only job is to “mark up” plain text so it can tell the browser: “This piece is a heading, this sentence is a paragraph, and this element is a button”.
When you write an HTML file and open it, the browser reads it and builds a tree structure called the DOM (Document Object Model). Picture it as a branching set of boxes: the main box contains smaller boxes, which in turn contain text or further boxes. CSS and JavaScript will later act on exactly this tree. Without solid HTML they would have nothing to style or animate.
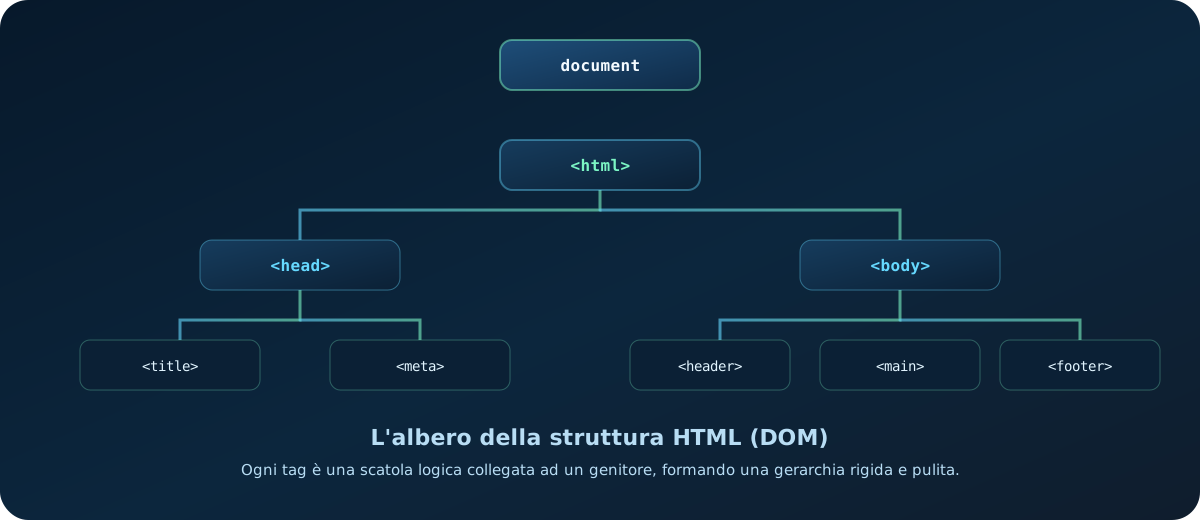
Now that we have a sense of how the browser organises information into boxes (the DOM), let's build our first box. To do that, we start from HTML's basic building block: the tag.
2. Anatomy of a tag, and the nesting rule
To give a web page structure, HTML uses tags — literally, labels. Imagine you have some plain text and you want to tell the browser: “This piece of text is a paragraph, while this other one is a heading”. To do that, you stick a label before and after the text.
These labels are written between angle brackets (the less-than < and greater-than > symbols) and, in most cases, always work in pairs:
- The opening tag (the start): marks where our element begins. You write the label's name between the angle brackets. To start a paragraph, for instance, we use
<p>(the “p” stands for paragraph). - The content: everything enclosed between the opening and closing labels (the paragraph's text, for example).
- The closing tag (the end): tells the browser where the element finishes. It is identical to the opening one but contains a forward slash
/placed straight after the first angle bracket, like this:</p>. Think of the slash as a stop sign.
These three parts together (opening tag + content + closing tag) form what is known as an HTML element.
marks where our element begins. To start a paragraph we use the <p> tag.
everything enclosed between the opening and closing labels.
tells the browser where the element ends. It carries a slash (/) before the name, as in: </p>.
Tags can also carry attributes: extra pieces of information placed exclusively inside the opening tag. Attributes specify an element's characteristics or behaviour (a link's destination, an image's source) and are always written in the form attribute-name="value" — a key="value" pair.
Let's look at a link (the <a> tag):
the address or parameter to point at (here, href).
the specific value tied to the attribute, always written in quotation marks ("https://codedge.it").
In this example:
- The key (the attribute's name) is
href, which tells the browser: “I want to set a destination web address”. - The value is
"https://codedge.it"(always in quotation marks after the equals sign=), which defines the specific web address.
A few rare tags contain no text and enclose nothing, so they need no closing tag. These are called empty tags (or self-closing tags). Examples are <img> for showing an image and <br> for a line break.
The nesting rule
In HTML, putting one tag inside another is called nesting. Picture the structure as a set of Russian dolls: a smaller box has to sit entirely inside a bigger one.
There is one very simple golden rule that keeps you from ever getting it wrong:
The last tag you open must always be the first one you close. You can never cross tags over!
To grasp this easily, think of the brackets you use when writing by hand. If you open a round bracket ( and then a square one [, you must close the square one first and the round one after. You cannot cross them like this: ( [ ) ].
Let's compare the wrong structure with the right one directly.
❌ The most common mistake (crossed tags)
Imagine you want to put a word in bold (with <strong>) inside a paragraph (with <p>):
<p>This text is <strong>very important.</p></strong>Draw it as boxes and the mistake jumps out:
Here the boxes slice through each other. That forces the browser to guess, and it can break the page's appearance.
✅ The correct structure (tidy boxes)
To fix it, we make sure the smaller box (the bold) closes before the bigger one (the paragraph):
<p>This text is <strong>very important.</strong></p>Now the boxes sit perfectly one inside the other:
The hierarchy is now clean, logical and trivially easy for any browser or screen reader to interpret.
Modern browsers do their best to “fix” nesting errors on their own, but making them do so slows them down and forces them to guess your intentions. That often leads to unexpected visual bugs, problems on mobile devices, or difficulties for people using screen readers.
Now that you know how to write a single tag, how to set attributes and how to fit boxes inside one another without mistakes, let's put all the pieces together. In the next chapter we look at the starting skeleton shared by every web page that exists.
3. The basic skeleton (boilerplate)
In the previous chapters we covered HTML's theory: how the browser thinks as it builds the tree (the DOM) and the rules for writing individual tags correctly. Now let's take a step forward and combine those ideas to build our first real file.
Every web page needs a fixed starting structure before the browser can interpret it. That repetitive structure — a genuine blank canvas — is known as the boilerplate. In VS Code you can type ! and press Enter to generate it instantly, but as good developers we should understand every single line of it:
<!DOCTYPE html>
<html lang="en">
  <head>
    <meta charset="UTF-8">
    <meta name="viewport" content="width=device-width, initial-scale=1.0">
    <title>My first web page</title>
  </head>
  <body>
    <!-- The site's visible content goes here -->
  </body>
</html>
How the structure is organised:
<!DOCTYPE html>: a technical declaration. It shouts at the browser: “Careful, this is a modern HTML file (HTML5), read it using current standards!”. It must be written as the very first line, at the top.<html lang="en">: the root box containing everything else. Thelang="en"attribute matters a great deal: it declares that the text is in English, which helps search engines index it and lets screen readers pronounce it with the right intonation.- The split into two main areas: notice how the content inside
<html>is divided into two big nested boxes:<head>(the control room): holds the metadata — information useful to the browser and to Google but invisible to visitors (theUTF-8character encoding for accented letters and emoji, or the tab's title in the<title>tag).<body>(the visible stage): the page's body. Everything we put in this block appears on the user's screen.
Now that your empty container is set up, it is time to go inside the <body> and start exploring the catalogue of tags: the actual bricks we will fill our page with. We begin with the foundation of any communication: writing text.
4. The page's text: paragraphs and headings
What is the <body> tag?
The <body> tag is, to all intents and purposes, your website's visible canvas. Everything a user sees, reads, clicks or interacts with inside the browser window — text, headings, images, video, buttons, navigation menus, contact forms — must go inside this box, without exception.
To see why it matters, think of a paper letter:
- The
<head>is the envelope: it carries the recipient's address, the stamp, the sender. Essential information for getting the letter delivered, but nobody reads the envelope to find out the message. - The
<body>is the sheet of paper inside: the actual message, the written words, the drawings or the enclosures. It is what the reader actually cares about.
There are three golden rules to keep in mind whenever you work with the <body>:
- Uniqueness: there can be one and only one
<body>tag in an HTML file. You cannot have “two bodies”. - Position: it opens straight after the
<head>closes (that is, after</head>) and closes right before the page's final closing tag (before</html>). - Nothing outside the edges: writing code or placing visible tags outside
<body>(below its closing tag, for instance) is a serious syntax error. Modern browsers try to patch it up by quietly forcing the code back into the body, but that creates bugs which are very hard to track down in your layout (CSS) and your interactive behaviour (JavaScript).
Now that it is clear what this space is and why it exists, let's start filling it. We begin with by far the most common case: text.
Why “bare” text is not enough
The instinctive first move is to write the text straight inside the body, breaking lines where needed:
<body>
  HTML course
  This is the first sentence.
  This should be a separate sentence.
</body>
Open this file in a browser and you will see one thing, all on a single line:
HTML course This is the first sentence. This should be a separate sentence.That is not a bug. It is the most important rule to understand about text in HTML:
Any run of spaces, tabs and line breaks you write in the code is collapsed by the browser into a single space. Pressing Enter in your editor does not break the line on the page, and twenty spaces do not push things twenty spaces apart.
This means the page's appearance does not depend on how you format the code, only on which tags you use. The indentation in the file is there for you to read, not for the browser. To genuinely separate two blocks of text, you need tags.
The paragraph: <p>
The <p> tag (paragraph) encloses a complete block of text. Each paragraph takes its own line, breaks by itself, and the browser leaves a little space above and below it.
<body>
  <p>This is the first sentence.</p>
  <p>This is a separate sentence, in a block of its own.</p>
</body>
Now the two texts really are two distinct blocks. Note that inside a paragraph you can lay the text out however you like, across several lines in the code: it will still be one block, because it is the tag that defines the block, not the line break.
Write <p>Text <p>more text</p></p> and the browser reports no error: it closes the first paragraph by itself as soon as it meets a second one, and you end up with a structure different from the one you had in mind. This holds for every block: no block goes inside a <p>. We will see why in chapter 6.
Headings: from <h1> to <h6>
A long text made only of paragraphs is unreadable: you need to break it into sections with headings. HTML provides six heading tags, from <h1> to <h6>.
The number does not indicate the font size: it indicates the depth level, exactly like the numbers in a table of contents. <h1> is the title of the whole page, <h2> opens a main section, <h3> a sub-section of that section, and so on.
<h1>Cookery course</h1>
<p>Welcome to the course. Here is what we will cover.</p>

<h2>The equipment</h2>
<p>Before cooking you need the right tools.</p>

<h3>Knives</h3>
<p>Three are enough to get started.</p>

<h3>Pans</h3>
<p>Better a few good ones than many poor ones.</p>

<h2>The first recipes</h2>
<p>Let's start with something simple.</p>
The tags you see written describe this structure, which is the page's table of contents:
Cookery course                  [h1]  ← the page's title
 │
 ├── The equipment              [h2]  ← section
 │    ├── Knives                [h3]  ← sub-section
 │    └── Pans                  [h3]  ← sub-section
 │
 └── The first recipes          [h2]  ← section
This hierarchy is not just theory: Google uses it to understand how content is structured, and screen readers use it so that blind users can orient themselves and jump quickly from one section to another.
The three rules of headings
- One
<h1>per page. It is the document's title, so there is only one, like the title of a book. - Do not skip levels. After an
<h2>you can use an<h3>, not an<h4>directly: it would leave a hole in the outline. - Choose the level by logic, never by how big it looks on screen. The browser gives headings a default size purely for convenience: you will change that size with CSS, without touching the tag.
“This <h2> comes out too big, I'll use an <h4> because it's smaller.” In doing that you have broken the document's outline for a visual reason. Use the right tag for the hierarchy and shrink it with CSS: they are two different problems, and HTML only deals with the first.
Headings and paragraphs establish a page's overall frame. Often, though, you need to highlight or give special meaning to individual words or phrases inside a paragraph (to mark an important term or a fragment of code, say) without breaking the line. That is the job of inline tags, which we look at in the next chapter.
5. Marking up words: inline tags
In the previous chapter we used tags that create whole blocks of text and break the line automatically (paragraphs <p> and headings). Inline tags, by contrast, go directly inside a piece of text. They highlight or define one or more specific words without breaking the line or interrupting the paragraph's flow.
Before we look at the individual tags, there is a golden rule to understand: HTML exists to define text's meaning (its semantics), not its appearance. Today, any purely visual effect — changing a colour, enlarging a character, applying complex styling — is handled far more effectively and professionally with CSS.
Use the tags in this chapter only when you want to give a word a precise meaning (to make clear to Google or a screen reader that a term is crucial, or that it is an abbreviation). If your aim is purely decorative or visual, reach for CSS instead.
<p>Remember: the <code><title></code> tag is <strong>mandatory</strong> on every page.</p>The sentence stays a single sentence: <strong> and <code> do not create a new block, they mark up part of existing text.
The inline tags you will actually use
| Tag | Meaning | Default rendering |
|---|---|---|
| <strong> | Content of strong importance: a warning, a critical word. | Bold |
| <em> | Emphasis: the word the stress falls on when reading the sentence aloud. | Italic |
| <code> | A fragment of code or a technical name (a file, a command, a tag). | Monospace |
| <mark> | Text highlighted because it is relevant in this context (a searched-for term, say). | Yellow background |
| <a> | A link. The most important inline tag: chapter 8 is devoted to it. | Blue underlined text |
| <abbr> | An abbreviation; the expanded meaning goes in the title attribute. | None, or a dotted underline |
| <time> | A date or a time, machine-readable via datetime. | None |
| <small> | Side notes: copyright, disclaimers, legal small print. | Smaller type |
| <del> <ins> | Text removed and text added relative to an earlier version. | Struck through / underlined |
| <sub> <sup> | Subscript and superscript: chemical formulas, powers, footnotes. | Lowered / raised text |
| <span> | No meaning at all: a neutral container, covered in chapter 12. | None |
<p>
  <abbr title="HyperText Markup Language">HTML</abbr> was born in
  <time datetime="1991">1991</time>. The formula for water is
  H<sub>2</sub>O and the price is <del>£20</del> <ins>£15</ins>.
</p>
<strong> or <b>? <em> or <i>?
<b> and <i> also exist, and on screen they give exactly the same result (bold and italic). They have not been removed from the standard, but they mean something different: they mark text as visually distinct without attaching importance to it (a scientific name in italics, say, or an article's keywords in bold).
If the word is important or needs emphasis when read, use <strong> and <em>: a screen reader can change its tone of voice, and a search engine takes it into account. If you only want a visual effect, use neither: that is CSS's job.
Breaking lines for real: <br> and <hr>
We said that pressing Enter in the code does not break the line. When the line break is part of the content — a postal address, the lines of a poem — you use the empty tag <br>:
<p>
  Codedge Ltd<br>
  12 Roma Street<br>
  00100 Rome
</p><br> to create spaceStacking three <br> in a row to push two blocks apart is the most recognisable beginner mistake there is. Space between elements is controlled with the CSS margin property. <br> is only for when the new line is part of the text.
The <hr> tag, also empty, marks a thematic break between two parts of the content (the browser draws it as a horizontal line). Same principle: if all you want is a decorative line, use CSS.
Writing special characters: entities
What if you want to display the < symbol itself on screen? The browser would think you were opening a tag. That is why HTML entities exist: sequences beginning with & and ending with ;.
| You write | You get | When you need it |
|---|---|---|
| < | < | Showing HTML code inside a page |
| > | > | As above |
| & | & | The ampersand, which would otherwise start an entity |
| | non-breaking space | Keeping two words on the same line (e.g. 10 kg) |
| © | © | The copyright symbol in a footer |
Accented letters and emoji need no entities: the file just has to declare <meta charset="UTF-8">, as in the boilerplate from chapter 3.
Comments
You can leave notes in the code that the browser ignores entirely, by wrapping them in <!-- and -->:
<!-- Offers section: update every Monday -->
<p>20% off the whole catalogue.</p>They do not appear on the page, but they stay in the file: anyone can read them with “View page source”. Do not put passwords, confidential notes or remarks about clients in them.
By now you have used tags that take a whole line and tags that stay inside the line. That difference is not accidental: it is the classification the whole of HTML rests on. Let's look at it.
6. Block and inline: how the browser lays elements out
Why do two <p> elements end up one below the other, while two <strong> elements sit side by side on the same line? Because every HTML element belongs, by default, to one of two categories.
Block elements
- They always start on a new line and push whatever follows onto the next one.
- They take up the full available width of their container, even when the content is short.
- They can contain other blocks and inline elements.
Blocks include: <p>, <h1>…<h6>, <div>, <ul>, <ol>, <li>, <table>, <form>, <figure>, <hr>, <header>, <nav>, <main>, <article>, <section>, <aside>, <footer>.
Inline elements
- They do not break the line: they flow within the line of text alongside the words.
- They take up only the space of their content, not a millimetre more.
- They must contain text or other inline elements, never a block element.
Inline elements include: <a>, <strong>, <em>, <code>, <span>, <img>, <br>, <abbr>, <input>, <label>.
Try this example: the two paragraphs stack, the two <span> elements stay together.
<p>First block: I take the full width.</p>
<p>Second block: I sit below the first.</p>

<p>
  <span>First inline.</span>
  <span>Second inline: I am on the same line.</span>
</p>
Why you need to know this now
Because this distinction is where the most frequently broken nesting rule comes from:
Writing <span><h2>Heading</h2></span> or <p><div>...</div></p> is invalid code. The browser does not stop: it rewrites the tree however it likes, and you end up with a result you do not understand and CSS that seems “not to work”.
There is one very important exception to this rule: the link tag <a>, although an inline element, can enclose whole blocks (headings, paragraphs, entire <div> elements). That is essential for making a whole area or a product card clickable, rather than just its text:
<a href="/products/mug/">
  <h3>Codedge mug</h3>
  <p>Glazed ceramic, 350 ml.</p>
</a>It is easy to mix up HTML's nesting rules with how elements look:
- HTML's rules (structural): they define whether the code is valid. You cannot put a
<p>(block) inside a<span>(inline), for instance. This hierarchy is fixed, and it determines how the browser interprets the document. - CSS's properties (visual): through the
displayproperty (display: blockordisplay: inline) you can tell the browser to show a<span>at full width as though it were a block, or a paragraph on the same line as though it were inline.
Remember: changing the visual behaviour with CSS does not change HTML's rules. Even if you apply display: block to a <span>, putting a paragraph or a heading inside it remains illegal.
You know how tags are written and how they are laid out. One cross-cutting piece is missing: the attributes you can put on any tag, which the coming chapters will use constantly.
7. Universal attributes: giving tags an identity
So far we have seen attributes that only work on certain tags: href, for example, makes sense on a link but not on a paragraph. HTML also provides global attributes (or universal ones): attributes you can write on any element.
The two most important are id and class, and both do the same job: giving an element a label so you can find it again later. The only difference is how many times that label may appear on the page:
id: like a student's registration number. It belongs to one single element: two elements on the same page cannot share anid.class: like saying “the students in class 3A”. It can be repeated on as many elements as you like, and an element can belong to several classes at once.
Writing an id or a class changes neither the appearance nor the behaviour of the page: the browser displays nothing different. They are names that prepare the ground, and they become useful when something goes looking for them: a link, a CSS stylesheet or some JavaScript.
1. The id attribute: a unique name
id assigns a name identifying a single element on the page. You write it like any other attribute, inside the opening tag:
<h2 id="contact">Where to find us</h2>
<p>We are at 12 Roma Street, open Monday to Friday.</p>
What is a unique name good for?
- In HTML: for creating links that jump to a specific point on the page (anchors, which we will see in the next chapter) and for tying a form's label to its input.
- In CSS: for styling that one element.
- In JavaScript: for reaching that specific element and changing it, in response to a click for instance.
id:- It must be unique on the page: repeat it and the page still displays, but links and JavaScript will only find the first element, and the behaviour becomes unpredictable.
- It cannot be empty and cannot contain spaces: write
contact-section, notcontact section. - It is case-sensitive:
Contactandcontactare two different ids. - To stay safe, use only lowercase letters, digits and hyphens, and always begin with a letter.
2. The class attribute: a group label
class groups elements under a common category. The same class can appear on as many elements as you like:
<p class="notice">Shipping is running normally.</p>
<p class="notice">Last day to order!</p>
<p>This paragraph has no classes: it is not part of the group.</p>
An element can also belong to several groups at once: just write the names separated by a space. That is not “one class with a space in it”, it is two distinct classes:
<p class="notice urgent">Deliveries suspended today.</p>What is grouping good for?
- In CSS: for giving every element in the group the same appearance by writing the rule once.
- In JavaScript: for acting on every element in the group with a single instruction.
- For whoever reads the code: a name like
product-cardsays at a glance what role that element plays.
# and . are not written in the HTML!When you meet CSS later, you will see ids preceded by a hash (#contact) and classes preceded by a dot (.notice). Those symbols exist only to call them up from outside: they tell the browser “find the element with this id” or “find the elements with this class”. In the HTML tag you write only the name.
- ❌ Wrong:
<h2 id="#contact">—<p class=".notice"> - ✅ Right:
<h2 id="contact">—<p class="notice">
The one exception you will see in HTML is the href of an internal link, which points at an id and therefore uses the hash: <a href="#contact">.
If you need to reach that precise element (a section to point a link at, a form field), use id. If you are describing a type of element that might repeat (a button, a highlighted box, a product card), use class. When in doubt, use class: you can never accidentally create duplicates.
Other useful global attributes
Besides those two, there are others you will meet often:
| Attribute | What is it for? | Practical note |
|---|---|---|
| lang | Declares the text's language, useful to search engines and screen readers. | Put it on the <html> tag for the whole page (e.g. lang="en") and on a single element only where the language changes. |
| title | Shows a small explanatory tooltip when the mouse hovers. | Do not put essential information in it: on phones, and for keyboard users, it often never appears at all. |
| hidden | Tells the browser the element is not relevant yet: it is neither displayed nor read out by screen readers. | It takes no value, you just write it in the tag: <p hidden>...</p>. |
| style | Applies CSS rules directly to that single tag. | Best avoided: it mixes presentation with structure and cannot be reused. Use class and a stylesheet. |
For instance, if you drop a phrase or a quotation in another language into an English page, it is good practice to flag it like this:
<p>The company's motto is <span lang="it">chi va piano va sano</span>.</p>That way the screen readers used by people with visual impairments will pronounce the phrase in Italian, rather than reading it as if it were English.
Now that you know how to give an element an id, we can tackle the tag that turned the web into a web: the link.
8. Links: connecting pages
The hyperlink is what turns isolated pages into a site, and sites into a web. You create one with the <a> tag (anchor) and its href attribute (hypertext reference), which gives the destination.
<a href="https://codedge.it">Go to the Codedge site</a>The text between the two tags is the visible, clickable part; href is the address, which the user does not see. An <a> without an href is not a link: it is just text.
The possible destinations
| Type | Example href | Effect |
|---|---|---|
| Absolute URL | https://google.com | Goes to another site. You need the full address, with https://. |
| Root-relative path | /contact/ | Goes to a page on your own site, starting from its root. |
| Relative path | products.html | Goes to a file, looking for it from the current page's folder. |
| Anchor | #contact | Scrolls to the element with id="contact" on the current page. |
| mailto:info@site.com | Opens the mail program with the recipient already filled in. | |
| Telephone | tel:+390612345 | On a phone, starts the call. |
Relative paths, explained once and for all
This is where everyone trips up. Imagine this folder structure on your computer:
site/
├── index.html          ← the home page
├── about.html
├── images/
│   └── logo.png
└── blog/
    ├── index.html      ← the blog's home page
    └── first-post.html
A relative path is read starting from the folder holding the page you are writing. The ../ symbol means “go up one folder”.
| You are in | You want to reach | You write |
|---|---|---|
| index.html | about.html | about.html |
| index.html | blog/first-post.html | blog/first-post.html |
| blog/first-post.html | index.html (the home page) | ../index.html |
| blog/first-post.html | images/logo.png | ../images/logo.png |
blog/index.html means “the blog folder inside the one I am in now”. /blog/index.html, with the leading slash, means “start from the site's root, wherever I happen to be”. Root-relative paths are more convenient for navigation menus, because they work identically from any page.
Opening in a new tab
The target="_blank" attribute opens the destination in a new tab, leaving the starting page open.
<a href="https://github.com" target="_blank" rel="noopener noreferrer">
  Open GitHub in a new tab
</a>
The rel="noopener" attribute stops the destination page manipulating the originating one via JavaScript; noreferrer also avoids telling it where the visitor came from. Recent browsers apply noopener themselves with target="_blank", but writing it remains the right habit and covers older browsers.
target="_blank"Firing off tabs takes the back button out of the user's control. Use it for external links or documents to consult alongside, never for navigation within your own site.
Writing good link text
Screen reader users can ask for a list of every link on the page, read out of context. A list of twelve “click here” entries is unusable.
| Avoid | Better |
|---|---|
| For the price list click here. | See the 2026 price list. |
| Read more | Read the article on HTML semantics |
Link text should describe its destination even when read on its own. That is the accessibility rule for links, and it doubles as good SEO practice.
Your pages now talk to each other. Let's add visual content.
9. Images and media
Images are inserted with <img>, an empty tag: it encloses nothing and has no closing tag, so all the information travels through attributes.
<img src="/images/cat.jpg"
     alt="Ginger cat asleep on a grey sofa"
width="800" height="600">| Attribute | What it does | Required? |
|---|---|---|
| src | The image file's path. It follows the same rules as the links in chapter 8. | Yes |
| alt | The alternative text, read out when the image cannot be seen. | Yes |
| width height | The file's real dimensions in pixels. | Strongly recommended |
| loading | With lazy, the image is downloaded only when it is needed. | No |
Writing the right alt
The alt attribute is read by screen readers, appears if the file fails to load, and is used by search engines. There is no absolutely “right” text: it depends on the role the image plays on the page.
- The image carries information → describe the information:
alt="Chart: sales up 30% in 2025". - The image is inside a link or a button → describe the destination, not the picture:
alt="Back to the home page", notalt="logo". - The image is purely decorative → leave the attribute empty:
alt="". The screen reader then skips it, instead of reading out the file name. - The text is already written next to the image →
alt="", so the same thing is not announced twice.
alt is not the same as leaving it emptyWriting alt="" declares “this image is decorative, ignore it”. If the attribute is missing altogether, the screen reader does not know what to do and reads the file name, producing things like “image d s c underscore 0042 dot jpg”. Always write alt, even when it is empty.
Why you should give width and height
The browser draws the page before it has finished downloading the images. If it does not know how much space to reserve, it lays the text out and then makes it jump when the image arrives: that is the irritating layout shift that loses your place on the page. Give the file's real dimensions and the space is reserved immediately.
width and height declare the file's native dimensions, so the browser knows the aspect ratio. How big it actually appears on screen is decided with CSS.
Which format to choose
- WebP / AVIF: today's default choice. The same quality as JPEG and PNG in much lighter files.
- JPEG: photographs, where maximum compatibility matters.
- PNG: images with a transparent background, or flat-colour graphics.
- SVG: logos, icons and diagrams. A vector format: it stays sharp at any size and weighs almost nothing.
An image with a caption: <figure>
When an image has a caption, do not put it in an ordinary <p>: there would be no connection between the two. Use <figure> to group them and <figcaption> for the caption.
<figure>
  <img src="/images/client-server-diagram.png"
       alt="The browser sends a request to the server, which responds with the page"
       width="600" height="400" loading="lazy">
  <figcaption>Figure 1 — The request/response cycle between client and server.</figcaption>
</figure>
The caption describes the image for people who can see it; alt replaces it for people who cannot. They are two different texts with two different purposes: do not copy one into the other.
Video and audio
Video and audio work the same way, with the controls attribute showing the playback controls:
<video src="/media/demo.mp4" controls width="640" poster="/media/preview.jpg">
  Your browser does not support video. <a href="/media/demo.mp4">Download the file</a>.
</video>
The text inside the tag appears only if the browser cannot play the file. The poster attribute gives the image to show before playback starts. Avoid autoplay: a video that starts by itself with sound is the fastest way to get the page closed.
Text and images are sorted. Let's move on to organising information into lists.
10. Lists
Lists are for whenever you have several items of the same kind. Not just bullet points: navigation menus, product galleries and search results are all, underneath, lists. Marking them as such tells screen readers how many items are still to come.
Unordered list: <ul>
For when the order of the items does not change the meaning. The container is <ul> (unordered list), each entry is an <li> (list item).
<ul>
  <li>Flour</li>
  <li>Sugar</li>
  <li>Eggs</li>
</ul>
Ordered list: <ol>
For when the order matters: instructions, rankings, steps. The browser handles the numbering; you do not write the numbers.
<ol>
  <li>Heat the oven to 180 °C</li>
  <li>Mix the ingredients</li>
  <li>Bake for 40 minutes</li>
</ol>
On <ol> you can use start="5" to begin from a different number, reversed to count backwards and type="a" to number with letters.
Lists inside lists
This is where the most common mistake hides. The child list goes inside the <li> it belongs to, not between one <li> and the next:
<ul>
  <li>Drinks
    <ul>
      <li>Water</li>
      <li>Wine</li>
    </ul>
  </li>
  <li>Desserts</li>
</ul><li> goes inside <ul> and <ol>A <div>, a <p> or loose text as direct children of a list is invalid. Any content has to go inside an <li> first, and that <li> can then contain whatever you like.
Description list: <dl>
For term/explanation pairs: glossaries, FAQs, spec sheets. The container is <dl>, the term is <dt>, the description is <dd>.
<dl>
  <dt>URL</dt>
  <dd>The unique address of a resource on the web.</dd>

  <dt>DOM</dt>
  <dd>The tree the browser builds as it reads the HTML.</dd>
</dl>
A <dt> can have several <dd> elements (one term with several meanings), and several <dt> elements can share a <dd> (synonyms).
The practical case: a navigation menu
A menu is a list of links. Written this way, a screen reader announces “list of 3 items” and lets the user skip the whole thing.
<ul>
  <li><a href="/en/">Home</a></li>
  <li><a href="/services/">Services</a></li>
  <li><a href="/en/contact/">Contact</a></li>
</ul>
The bullets and the vertical stacking are removed with CSS: looking like a horizontal bar is a visual choice, while the list remains the correct structure.
Lists organise data in one dimension. When there are two dimensions, you need tables.
11. Tables
A table is for tabular data: information that only makes sense where a row and a column meet. A price list, a train timetable, a comparison of subscription plans.
In the nineties, layouts were built from invisible tables. Today that is a serious mistake: a screen reader announces rows and columns that do not conceptually exist, and the page becomes impossible to adapt to small screens. For layout there is CSS and the semantic tags in chapter 13.
The full structure
<table>
  <caption>2026 subscription plans</caption>
  <thead>
    <tr>
      <th scope="col">Plan</th>
      <th scope="col">Monthly price</th>
      <th scope="col">Storage</th>
    </tr>
  </thead>
  <tbody>
    <tr>
      <th scope="row">Basic</th>
      <td>£9.99</td>
      <td>10 GB</td>
    </tr>
    <tr>
      <th scope="row">Premium</th>
      <td>£14.99</td>
      <td>100 GB</td>
    </tr>
  </tbody>
</table>| Tag | Role |
|---|---|
| <table> | The container for the whole table. |
| <caption> | The table's title. It goes straight after <table> and tells listeners what it is about. |
| <thead> | The header row (or rows). |
| <tbody> | The body, with the data. |
| <tfoot> | A final summary row — totals, for example. |
| <tr> | A row (table row). It contains the cells. |
| <th> | A header cell: it names a column or a row. |
| <td> | A data cell (table data). |
The attribute that makes a table accessible
Someone looking at a table crosses row and column with their eyes. Someone listening to it cannot: they hear the cells one after another. The scope attribute on each <th> solves this by saying whether that header applies to a column (scope="col") or to a row (scope="row").
With scope set, the screen reader says “Premium, monthly price: 14.99 pounds” instead of a list of numbers with nothing to anchor them. Two words per cell, and the usability changes completely.
Merging cells
colspan stretches a cell across several columns, rowspan across several rows:
<tr>
  <td colspan="2">This cell spans two columns</td>
  <td>Normal</td>
</tr>
Use them sparingly: tables with too many merged cells become hard to read and hard to announce correctly.
A table will not shrink beyond a certain point. The standard solution is to wrap it in a container that scrolls horizontally — <div class="table-wrapper"> with overflow-x: auto in the CSS — instead of letting it burst out of the page.
You have now learned all the content building blocks. The question becomes: how do you group them? Let's start with the containers that mean nothing, so we can see why the ones that do mean something matter.
12. div and span: the neutral containers
Every tag we have seen so far says something: <p> is a paragraph, <ul> is a list, <th> is a header. Two of them say nothing at all, and that is exactly why they exist.
<div>is a block container with no meaning.<span>is an inline container with no meaning.
You will recognise the distinction: it is the one from chapter 6. A <div> behaves like a <p> (breaks the line, takes the full width), a <span> like a <strong> (stays within the line).
What they are for
Grouping elements so you can hook something onto them — nearly always a class for CSS, sometimes an id for JavaScript — when that grouping has no meaning of its own to convey.
<div class="product-card">
  <h3>Codedge mug</h3>
  <p>Glazed ceramic, 350 ml.</p>
  <p>Price: <span class="discounted-price">£12.90</span></p>
</div>
The <div> exists only to give CSS something to grab hold of when drawing the card's frame, background and borders. The <span> exists only to colour the price red. Remove the CSS and the page reads exactly the same: they are containers with zero meaning.
Ask yourself: “if I removed this tag, would the user lose any information?” If the answer is no, and it only existed for the styling, <div> is the right choice. If the answer is yes, you need a tag that genuinely expresses that meaning.
The mistake to avoid: “divitis”
Because <div> always works and never errors, the temptation is to build the whole page out of it:
<div class="header">
  <div class="nav">...</div>
</div>
<div class="main">
  <div class="article">
    <div class="title">How to write HTML</div>
    <div class="text">...</div>
  </div>
</div>
On screen, with the right CSS, this page can look identical to a well-written one. But to anything without eyes it is a field of anonymous boxes: the browser does not know what the main content is, Google cannot tell where the article begins, and a screen reader can offer no shortcuts because there is nothing to announce. Note too that <div class="title"> is not a heading: it appears in no document outline, whereas an <h1> does.
<div> and <span> are the last resort, not the first. Look first for the tag that describes what you are writing; if, and only if, none exists, use a neutral container.
The next chapter gives you the tags to look for before falling back on <div>.
13. Semantic HTML: the page's structure
HTML5 provides a set of tags that behave exactly like a <div> — they are block containers — with one decisive difference: they declare the role of the part of the page they enclose.
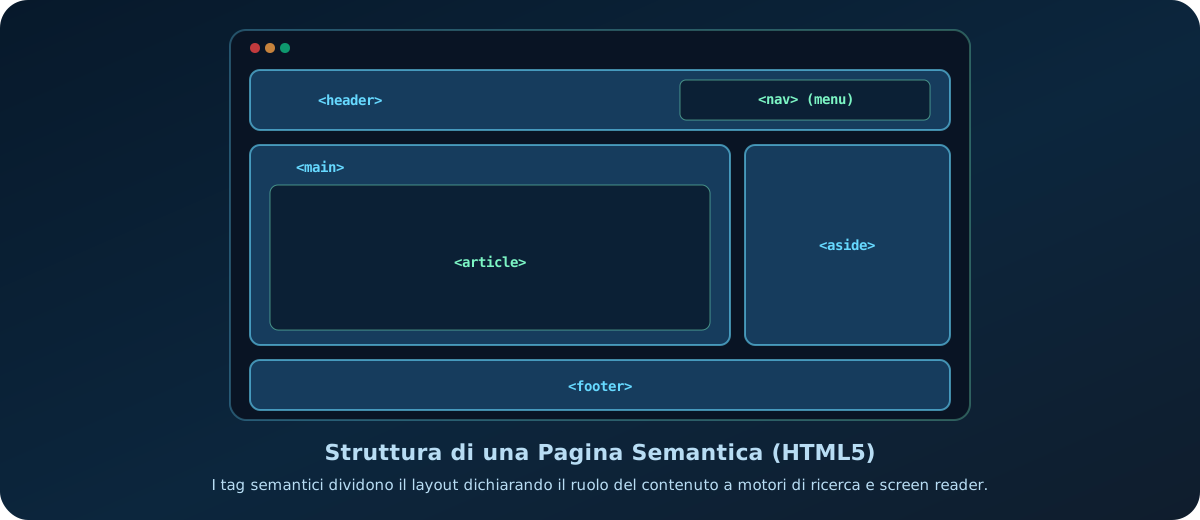
The structural tags
| Tag | What it encloses | How many per page |
|---|---|---|
| <header> | The heading area: logo, title, menu. It can also sit inside an <article>. | One main one, several inner ones |
| <nav> | A block of important navigation links. | More than one (menu, breadcrumbs) |
| <main> | The content specific to this page, excluding whatever repeats everywhere. | Exactly one |
| <article> | Content that stands on its own: a post, a review, a product card. | As many as needed |
| <section> | A thematic part of the document, always introduced by a heading. | As many as needed |
| <aside> | Side content: a sidebar, a callout box, related articles. | As many as needed |
| <footer> | The closing area: copyright, contacts, legal links. Also valid inside an <article>. | One main one, several inner ones |
A complete page
Here is how they fit together. Compare this structure with the field of <div> elements from the previous chapter: the on-screen result can be the same, the information conveyed is not.
<body>
<header>
<h1>The Codedge blog</h1>
<nav>
<ul>
<li><a href="/en/">Home</a></li>
<li><a href="/blog/">Blog</a></li>
<li><a href="/en/contact/">Contact</a></li>
</ul>
</nav>
</header>
<main>
<article>
<h2>How to write clean HTML</h2>
<p>Published on <time datetime="2026-03-14">14 March 2026</time>.</p>
<section>
<h3>Start from the structure</h3>
<p>Content first, styling second.</p>
</section>
<section>
<h3>Choose the right tags</h3>
<p>Every tag has a meaning: use it for that.</p>
</section>
</article>
<aside>
<h2>Related articles</h2>
<ul>
<li><a href="/blog/css-basics/">Introduction to CSS</a></li>
</ul>
</aside>
</main>
<footer>
<p>© 2026 Codedge</p>
</footer>
</body><article>, <section> or <div>?
This is the recurring question. Answer these three in order:
- Would this block make sense published on its own, detached from the rest of the page (in an RSS feed, shared on social media)? If yes →
<article>. - Otherwise: is it a thematic part with a heading of its own? If yes →
<section>. - Otherwise: it exists purely for the styling →
<div>.
<section> without a heading is almost always a <div>The <section> tag marks a section of the document's outline: if there is no <h2>–<h6> introducing it, the section has no name and you are conveying nothing. In that case use a <div>, which is more honest.
The concrete benefit: navigation shortcuts
<header>, <nav>, <main>, <aside> and <footer> are landmarks: reference points that screen readers list on request. A blind user can jump straight to the main content instead of listening to the menu again on every page of the site. With <div> elements that possibility simply does not exist.
The same principle applies to keyboard users. By making the first element of the <body> a link pointing at the <main>, you offer the same shortcut:
<a href="#content" class="skip-to-content">Skip to content</a>
...
<main id="content"> ... </main>
The page is structured and readable. One last thing it cannot do: receive something from the user.
14. Forms: collecting data from the user
Until now the page speaks and the user listens. With forms the flow reverses: searches, logins, sign-ups, orders and comments all go through here.
The <form> container
<form action="/signup" method="post"> ... </form>action: the address the data is sent to.method: how it is sent.getappends it to the URL, leaving it visible in the address bar: fine for a search, which is then shareable and bookmarkable.postsends it in the request body, outside the URL: mandatory for passwords, personal data and anything that changes something on the server.
HTML builds the form and sends it. Receiving the data, checking it and storing it requires a program on the server (in PHP, Python, Node.js…) or some JavaScript. If you open a form from your own computer and press Submit, nothing useful will happen: that is normal.
The fields: <input> and its type
<input> is an empty tag that changes appearance and behaviour completely according to its type attribute:
| type | What it produces |
|---|---|
| text | A single-line text field. This is the default. |
| An email field: on a phone it shows the keyboard with the @ and the browser checks the format. | |
| password | Hides the characters as they are typed. |
| number | Numbers, with stepper arrows and min and max attributes. |
| tel | Phone numbers: brings up the numeric keypad. |
| date | A date picker supplied by the browser. |
| checkbox | A box with an independent choice (I accept the terms). |
| radio | A single choice among options: they exclude each other. |
| file | Selecting a file to upload. |
| submit | The button that submits the form. |
Choosing the right type is not pedantry: on its own it gives you the right keyboard on mobile, a validity check and, for dates, a calendar you did not have to program.
Every field needs a <label>
A field without a label is an empty box whose purpose nobody knows. The label is connected to the field by matching its for with the field's id:
<label for="email">Email address</label>
<input type="email" id="email" name="email">
The connection has two effects: the screen reader announces “email address, text field” when the user reaches it, and clicking the label moves the cursor into the field, widening the clickable area — a real benefit on a touchscreen.
placeholder does not replace a labelThe grey text inside the field vanishes as soon as you start typing: anyone who gets distracted has no way of knowing what belonged there, and the contrast is often too low to read anyway. Use the placeholder only for an example of the format, and always include a visible <label>.
The name attribute: the most important of all
When the form is submitted, every field sends a name = value pair. The name comes from the name attribute: it is the key the server uses to find the data.
name, the field is not submittedNo error, no warning: the data simply never leaves. It is the number one cause of forms “that don't work”. id is for the label, name is for the submission: you need both.
The other fields
<textarea>: multi-line text. It is not an input, it has a closing tag, and the initial value is written between the two tags.<select>with<option>: a dropdown menu. Each option has avalueattribute, and that is what actually gets sent.<button>: the button. Inside a form the default type issubmit: if you need a button that sends nothing, writetype="button"explicitly.<fieldset>with<legend>: groups related fields and gives the group a name. Indispensable withradiobuttons, since otherwise it is unclear which question they answer.
Validation that needs no code
The browser already knows how to reject an incomplete or malformed form, without a line of JavaScript:
| Attribute | Constraint imposed |
|---|---|
| required | The field cannot be left empty. |
| minlength maxlength | Minimum and maximum text length. |
| min max | Minimum and maximum value for numbers and dates. |
| pattern | The text must match a pattern (a 5-digit postcode, say). |
| autocomplete | Lets the browser fill in name, email and address automatically. |
These checks improve the user's experience, but they must always be repeated on the server: anyone can bypass the browser's validation.
A complete form
<form action="/contact" method="post">

  <label for="name">Full name</label>
  <input type="text" id="name" name="name" required autocomplete="name">

  <label for="email">Email</label>
  <input type="email" id="email" name="email" required
         placeholder="name@example.com" autocomplete="email">

  <label for="reason">Reason for getting in touch</label>
  <select id="reason" name="reason">
    <option value="info">Request for information</option>
    <option value="quote">Quote</option>
    <option value="support">Support</option>
  </select>

  <fieldset>
    <legend>How would you prefer to be contacted?</legend>

    <input type="radio" id="by-email" name="contact" value="email" checked>
    <label for="by-email">By email</label>

    <input type="radio" id="by-phone" name="contact" value="phone">
    <label for="by-phone">By phone</label>
  </fieldset>

  <label for="message">Message</label>
  <textarea id="message" name="message" rows="5" required></textarea>

  <input type="checkbox" id="privacy" name="privacy" required>
  <label for="privacy">I have read the privacy policy</label>

  <button type="submit">Send request</button>

</form>
Look at the two radio inputs: they have different id values (which must be unique) but the same name. It is that shared name that makes them alternatives to each other: change it and they become two independent choices the user can select at the same time.
The <body> can now do everything. Let's return to the top of the file, where you decide how the page presents itself to the world.
15. The head: metadata, SEO and social previews
In chapter 3 we defined the <head> as the document's invisible part. It does not hold what you read on the page, but everything needed in order to read it: how to interpret the characters, how to behave on phones, which stylesheets to load, what to show on Google and in chat apps.
The three lines you cannot do without
<meta charset="UTF-8">
<meta name="viewport" content="width=device-width, initial-scale=1">
<title>HTML course for beginners | Codedge</title>charset: declares the character encoding. Without it, accents and emoji turn into gibberish. Write it among the very first lines of the head.viewport: tells the phone to use the screen's real width. Without this line the phone pretends to be a desktop and shows the page shrunk down and unreadable.title: the browser tab's title, the bookmark's name and the blue title in search results. It is different from the<h1>, which lives in the body: keep it under 60 characters.
Getting found: metadata for search engines
<meta name="description" content="A practical guide to HTML: structure, semantic tags, links, images and forms explained step by step.">
<link rel="canonical" href="https://codedge.it/en/tutorials/html-fundamentals/">description: the roughly 150-character summary that appears under the title in search results. It does not directly affect ranking, but it decides whether anyone clicks.canonical: gives the page's official address. If the same content is reachable from several URLs, it stops it being treated as duplicate.
The preview when a link is shared
When you paste an address into WhatsApp, LinkedIn or Slack and a card appears with a title, a description and an image, that data comes from the Open Graph metadata. If you do not write it, the preview will be a bare link or a random crop of the page.
<meta property="og:title" content="HTML course for beginners">
<meta property="og:description" content="Structure, semantics, links, images and forms explained step by step.">
<meta property="og:image" content="https://codedge.it/images/preview.jpg">
<meta property="og:url" content="https://codedge.it/en/tutorials/html-fundamentals/">
<meta property="og:type" content="article">og:image needs an absolute address, with https://: social platforms download the image from their own servers, and a relative path would mean nothing to them. The standard size is 1200×630 pixels.
Linking CSS and JavaScript
The head is also where you declare the external files the page needs:
<link rel="stylesheet" href="/css/style.css">
<script src="/js/app.js" defer></script>
The stylesheet goes in the head because it is needed before the page is painted. For scripts, the defer attribute tells the browser to download them in parallel and run them only once the page is ready: you avoid blocking rendering and you make sure the elements you want to manipulate already exist.
The head is rounded out by the tab icon: <link rel="icon" href="/favicon.ico">.
A head you can copy
<head>
  <meta charset="UTF-8">
  <meta name="viewport" content="width=device-width, initial-scale=1">

  <title>Page title | Site name</title>
  <meta name="description" content="A summary of the page in about 150 characters.">
  <link rel="canonical" href="https://example.com/page/">

  <meta property="og:title" content="Page title">
  <meta property="og:description" content="A summary of the page.">
  <meta property="og:image" content="https://example.com/preview.jpg">
  <meta property="og:url" content="https://example.com/page/">

  <link rel="icon" href="/favicon.ico">
  <link rel="stylesheet" href="/css/style.css">
</head>
You have now seen the whole path: from the file's skeleton to the content tags, from semantic structure to forms, right through to the metadata. Before moving on to practice, let's look at the mistakes worth avoiding from the outset.
16. The 5 most common semantic mistakes (and how to avoid them)
To close on a practical note, here is a round-up of the mistakes beginners make most often, and the advice for fixing them straight away.
The `<br>` tag is only for breaking a line within a piece of text (a poem, a postal address). If you want to space two paragraphs or two visual boxes apart, use the CSS `margin` property. Do not force layout with HTML.
An inline element such as `<span>` or `<strong>` should never contain block elements like `<div>` or `<h2>`. Always respect the browser's logical flow, so you do not break the rendering.
Using an `<h3>` purely because it is smaller by default than an `<h2>`, wrecking the document's hierarchy, is a bad mistake. Use the right tags in logical numeric order, and change their visual size with the CSS `font-size` property.
Leaving images without an `alt` attribute (or putting the file name in it, e.g. `alt="new_logo_final2.png"`) is bad for SEO and a nightmare for screen reader users. Write short, clear, meaningful descriptions.
Using `<blockquote>` to indent text, or `<address>` just to make words italic, is an anti-pattern. Tags describe what the data is, not how it looks.
17. Quick reference (cheat sheet)
Here are the essential semantic tags to remember for structuring content correctly:
| Tag | Semantic role | Nesting rules |
|---|---|---|
| <header> | The main heading area of the page or of a section. | Usually holds logos, <h1>-<h6> headings or navigation. |
| <nav> | A section containing navigation links. | Often wraps an ordered <ol> or unordered <ul> list. |
| <main> | The document's main and unique content. | There must be only one per page, and it must not sit inside other semantic tags. |
| <article> | Self-contained, independent content (a blog post, say). | It should have a heading of its own (<h2>-<h6>). |
| <section> | A generic thematic section of the document. | Use it only when the section is logically meaningful and carries a heading. |
18. Practical challenge: put yourself to the test
There is no better way to learn than getting your hands dirty. Try this small challenge in the playground or in your own editor before moving on to the quiz:
Build a semantic structure for a personal profile page (a CV), containing a heading area, a list of interests and an accessible contact form.
Step-by-step instructions:- Use a
<header>to enclose your name (in an<h1>) and a descriptive subtitle. - Create a
<section>with an<h2>heading about your interests, listing three of them in an unordered<ul>list. - Add a
<form>with an email input and a<textarea>for messages. - Correctly associate each input with a visible
<label>by pairing theforandidattributes.
19. Where to go next
You have laid the foundations of your house on the web. Now that you have the structure under control, you can start decorating it and making it smart. Here are the natural next stops on your learning path:
- CSS fundamentals: the logical next step, for adding colour and style and defining the spatial layout of your HTML tags.
- VS Code essentials: learn to write code quickly using Emmet shortcuts, automatic suggestions and the ideal working environment.
- Browsers and DevTools: find out how to inspect the DOM, explore a page's elements in real time and diagnose bugs.
- All tutorials: back to the full list, to pick your next topic.
20. Check what you have learned (quiz)
Test what you have learned in this guide with a quick 10-question multiple-choice quiz.