A practical guide for developers
Developing with AI without losing control
Artificial intelligence has changed how software gets written faster than any technology before it. Every month brings more capable models, editors redesigned around AI, and agents able to read, modify and explain whole projects. Chasing every new release is a race you lose before you start.
So this guide does not start from the tools, but from the method. Tools change their names every six months; the principles for using them well stay the same: a clear goal, a clean context, small verifiable requests, and a final review that remains in your hands.
A developer's value is not disappearing: it is moving. How fast you type matters less and less; what matters more and more is your ability to direct the work, recognise a good solution, protect the project's quality and decide what is genuinely worth building. That is exactly what this guide is for: using AI as leverage without handing it the wheel.

1. Programmer or orchestrator? A false dilemma
The debate around AI has polarised into two schools of thought. It is worth knowing both, because each holds a truth and a mistake.
- “AI will do everything”: on this view, soon nobody will read code line by line. You will describe the result, the AI will write it, fix it and wire the pieces together, and you will be left with direction, priorities and taste. The truth in it: delegation really will increase, a lot. The mistake: without judgement you will not even notice when the AI is wrong, and it is wrong with exactly the same confidence it is right.
- “Code is written by hand”: on the opposite view, delegating too much atrophies your reasoning. If you cannot debug, do not understand data structures and do not read code critically, you assemble fragile systems that hold up only until the first serious problem. The truth in it: the fundamentals are still indispensable, more so than before. The mistake: refusing on principle the most powerful lever ever placed in a developer's hands.
The synthesis: orchestrate without abdicating
The solid path runs through both. AI accelerates writing, research, refactoring and debugging, and takes almost all the repetitive work off your hands. But orchestrating does not mean abdicating: responsibility for what goes into the project remains yours.
The modern developer resembles a director. They do not shoot every frame with their own hands, but they understand rhythm, light, tone and direction — and above all they recognise a weak scene when they see one. Without that eye, no crew in the world will hand them a good film.
Code works the same way, and this guide follows exactly that path: first you understand how the machine thinks, then you learn to turn vague requests into clear specifications, and finally you build a method where AI, Git, tests and review work together.
2. How an AI model thinks (and where it goes wrong)
A note from the AI assistant: to use a tool well you need to know where it can let you down. This chapter is the machine's point of view, told by the machine.
An AI model does not experience software the way you do. It does not feel the weight of a slow server, does not know the pressure of a release, has no aesthetic taste of its own. It works on patterns, probabilities and relationships between pieces of information: it produces the most plausible continuation of what you gave it, not necessarily the right one for your project.
That nature makes it extremely strong on well-bounded tasks, but it also generates recurring — and predictable — errors. Those are exactly the ones you need to learn to catch:
- Agreeableness: if you propose a weak choice, the model tends to go along with you rather than stop you — it is trained to be collaborative, not to act as a strict reviewer. Explicitly ask for a critical opinion (“what does not work about this approach?”), not just confirmation.
- No intent of its own: the model can write a technically perfect function without knowing whether that function is any use to the product. Deciding what is useful, simple and sensible cannot be delegated: it stays your job.
- Fragility with a messy context: given confused files, vague instructions or too much irrelevant information, the model fills the gaps by inventing: APIs that do not exist, conventions never adopted, structures the project does not have. It is not “lying” — it is completing a pattern with the material it has.
None of this makes AI useless or untrustworthy: it makes it a tool to be steered. The clearer the boundary of the request, the more solid the result becomes — and that is exactly what we will build in the coming chapters.
3. Before the prompt: the specification
Many people think using AI well means writing brilliant prompts. In reality the step change happens one move earlier: you have to know what you want to build. Ask for code while the idea is still fuzzy and you get a fuzzy answer — well written, perhaps, but fragile.
Before generating anything, turn the intuition into a small specification. Four lines are enough, one per question:
- Purpose: what problem does this change solve, for the user or for the project?
- Boundaries: which files and behaviours may the AI touch, and which must it leave alone?
- Success criteria: how, concretely, will you verify that the change works?
- Project style: which existing conventions must it respect?
In practice, a complete specification can be as small as this:
Purpose: stop the contact form submitting with an invalid email.
Boundaries: js/form.js only; do not touch the markup or the CSS.
Success: bad input → message under the field; valid input → normal submission.
Style: no external libraries, pure functions, names consistent with the rest of the file.
Writing it feels like a slowdown, and it is in fact the habit that saves the most time of all. A clear specification avoids mile-long patches, eliminates misunderstandings and — above all — gives you concrete criteria for judging the result, instead of assessing it “by feel”.
4. The tools: extensions, editors and agents
With the method settled, you can choose the tool. AI enters development in three forms today, in increasing order of autonomy: inline suggestions as you type, chat built into the editor for explaining and modifying portions of code, and agents able to read several files, propose a plan and apply coordinated changes under your supervision.
Extensions for VS Code
If you use VS Code, resist the temptation to install everything. Start with a single integration, learn it thoroughly and fit it into how you work; you can always switch later, knowing why.
- GitHub Copilot: the most widespread. Inline suggestions, chat, code explanation and increasingly agent-oriented flows.
- Gemini Code Assist: a good choice if you work close to the Google Cloud ecosystem or want a conversational assistant well integrated into the supported IDEs.
- Cody / Continue: the most flexible options, for anyone who wants to choose between different models, control the context precisely and customise the workflow.
AI-native editors and agents
Editors like Cursor and Windsurf put AI at the centre of the experience: they read several files together, propose work plans, apply coordinated changes and help you think about large parts of the project. More power in exchange for more responsibility: with these tools, being precise about the boundary is not optional, it is the prerequisite.
Practical tip: if you are starting out, prefer tools that force you to read and approve every change before applying it. That “slow” step is exactly when you learn — and it is the safety net you are missing until you can spot a bad patch at a glance.
5. Context and project rules: from generic code to your code
Context is what separates a textbook answer from an answer for your project. Without context, even the best model produces code that could belong to any codebase in the world. But the opposite excess is just as bad: dump half a project and a jumble of instructions into the chat and the model loses the thread and starts mixing things up.
The rule is: do not give everything, give what is needed. When you ask for a change, always include:
- the file or the section involved;
- the current behaviour and the desired one;
- the conventions already present in the project (names, structure, recurring patterns);
- the technical constraints: framework in use, forbidden libraries, browsers to support, existing CSS style;
- how you will verify the change once it is applied.
If you work with agentic assistants, go one step further: write your project rules in a dedicated file that the tool reads at every session. Commit style, component conventions, limits on dependencies, test commands, a preference for small changes. It is only a few lines, but it changes the nature of the tool: the AI stops behaving like a generic generator and starts moving inside your environment, under your rules.
"Before changing any code, read the files involved, summarise the current behaviour and propose a short plan. Keep the existing style, do not add dependencies and change only the files that need changing."6. Writing effective prompts
An effective prompt is not a magic formula: it is a request that is clear, complete and verifiable. Write “make me a login page” and you leave the AI dozens of unstated decisions — structure, styling, validation, error handling. It will fill them in on its own: sometimes guessing right, often not.
The best prompt is the one that leaves no room for pointless interpretation. Five blocks say everything: who the assistant should be, which project it is working in, what it must produce, which limits it must respect and how you will check the result.
[Role] Act as an experienced front-end developer.
[Context] The project uses Vite, vanilla JavaScript and plain CSS.
[Goal] Write a JS function to validate an email and a password.
[Constraints] Do not use external libraries. The password must be at least 8 characters and contain a digit.
[Expected output] Return { isValid: boolean, error: string } and show 3 input/output examples.
A request like this does not make the AI infallible, but it forces it onto clear rails: the generated code will be closer to the project's style, easier to check and far less prone to invented solutions. Note the final block, the most underrated one: asking for input/output examples hands you your first test cases.
The rule to take away: a good prompt is not long, it is checkable. If you cannot say how you will verify the answer, the request is too big or too vague — break it up before sending it.
7. The small-steps method (anti-frustration)
Frustration with AI almost always follows the same script: you ask for too much, you get too much, something breaks, you ask for an even bigger correction and the project gets worse. After three rounds of that you no longer know what changed, or where the error came from — and the fault is not the model's, it is the size of the requests.
The antidote is a simple routine: do not use AI to do everything in one shot. Use it to advance in small, readable, verifiable blocks. Four rules are enough.
The rules of the method
Rule 1: take small, isolated steps
Never a whole feature in one answer. Ask for one piece at a time: a function, a component, a fix, a contained refactor. The measure is this: if you can read and try the result in a few minutes, the size is right; if you need half an hour just to understand what changed, it was too much.
Rule 2: Git is your parachute
Before generating significant changes, make a clean commit or open a temporary branch. If the direction turns out to be wrong, you go back with one command instead of reconstructing from memory. The paradox is only apparent: Git makes you bolder in experiments precisely because it protects you from the ones that go badly.
Rule 3: read and understand BEFORE saving
Do not accept a suggestion because it “looks plausible” — plausibility is exactly what models excel at, including when they are wrong. Reread the code, check the names, look at what it imports, verify that it follows the project's style. And if a line is not clear to you, stop and ask a targeted question:
"Explain this line simply and tell me which edge cases it might not handle."Rule 4: diagnose first, then ask the AI
When something breaks, resist the urge to paste the error into the chat with a “why doesn't this work?”. Take the first diagnostic step yourself: console, logs, the line involved, the last change you made. Then bring the AI that precise point, with the context already narrowed. The less noise you give it, the more useful the answer — and in the meantime you will have kept your debugging muscle in shape, which stays yours.
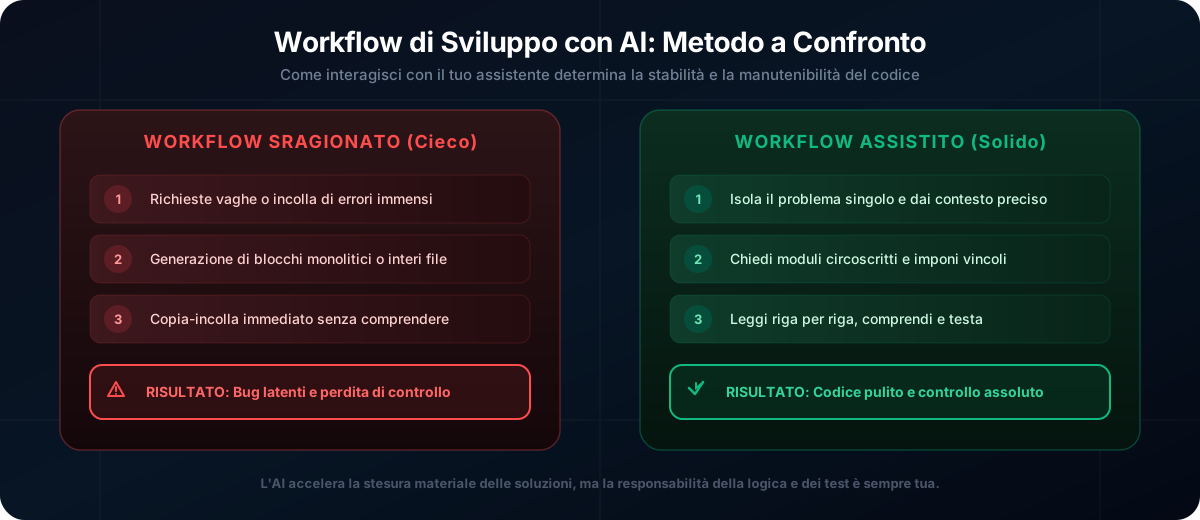
8. The 8-step pipeline: from brief to finished project
When you start a project with AI, the temptation is to ask for the final result straight away: “Make me a landing page for a gym”. It looks efficient, but it is a recipe for disaster: you force the agent to guess hundreds of decisions on its own — structure, content, styling, file architecture — and get back a monolithic block you cannot review, full of choices nobody ever really made.
The step change comes from inverting the approach: treat the assistant as a miniature development team and guide it along an 8-step pipeline, one step at a time. Each step has a single goal, produces a small result and closes with a check by you. The agent therefore faces one problem at a time — the condition in which models work best — and you keep control over every decision that enters the project.
A good team does not put the same person on everything: each role has a different disposition. The same principle applies with AI — assign it the right role for the phase you are in:
The AI's roles in the workflow
Architect
Designs the structure and the user experience, defines the file tree and assigns responsibilities — all before a single line of code exists.
Developer
Builds the interface in isolated blocks, one section at a time, and adds dynamic logic only once the structure and styles are stable.
Reviewer
Rereads the code with a hostile eye: hunts for latent bugs, duplication and structural weaknesses, and judges how easy it will be to maintain.
Optimiser
Polishes the now-working project: cleans up the stylesheets, lightens the assets and looks after performance, SEO and accessibility (a11y).
The pipeline, step by step
In the example that follows the project is a landing page for a gym, but the sequence is identical for any project: first you decide, then you build, finally you polish. The rule that holds it all together: you do not move to the next step until you have verified the result of the current one.
STEP 1 — The brief: you design, you do not program
The first prompt does not ask for code: it asks for a design. Page structure, user experience, how the sections are organised. The explicit prohibition (“do not write code”) is the most important part of the request: without it, the model jumps straight to implementation.
"Let's design a template for a gym. I want a professional landing page made up of Home, About, Services, Pricing, Trainer, Contact. Do not write code. Define the structure, the UX and how the content is organised."Before moving on: read the proposal as a client would. Is every section needed? Is anything missing? Cut and correct now — every ambiguity that survives the brief will come back multiplied in the code.
STEP 2 — The architecture: the file tree
With the content structure validated, ask for it to be translated into a folder layout. The criterion to impose is single responsibility: each file does one thing, and its name says which.
"Create the folder tree for a Vite project using HTML, CSS and vanilla JavaScript. Every file must have one precise responsibility."The result is a modular, tidy structure that is easy to navigate:
src/
├── assets/
│   ├── images/
│   └── icons/
├── css/
│   ├── base.css
│   ├── layout.css
│   ├── components.css
│   └── utilities.css
├── js/
│   ├── main.js
│   ├── menu.js
│   ├── slider.js
│   └── form.js
└── index.html
Before moving on: ask yourself whether you could explain what each file is for. If you could not justify one of them, ask the AI to justify it or remove it: architecture gets fixed now, not once ten of them exist.
STEP 3 — The project's hard rules
Before the first line of code, write down the non-negotiable rules. This is not bureaucracy: without explicit constraints the model slides towards its generic habits, and the quality of the code gets decided by chance instead of by you.
"Before you start writing code, follow these rules:
- Using !important in the CSS is forbidden
- No duplicated CSS
- No inline JavaScript
- Use descriptive names
- Comment only where it helps
- Avoid workarounds
- If you find a structural problem, propose a solution instead of adding more code."
The last rule is the most valuable: it authorises the AI to stop and flag an underlying problem, instead of burying it under a patch.
STEP 4 — One section at a time
Here the building begins, and here you need the most discipline. No massive requests like “build me the whole site”: one section per request, HTML and CSS together, in blocks you can read from start to finish.
- "Create the HTML structure and the CSS for the Hero section only."
- "Now move on to the navbar (header)."
- "Now do the Services section."
Before moving on: open the page in a browser and look at the section you just built, on mobile too. Every approved section becomes stable ground for the next one to rest on.
STEP 5 — The JavaScript, last
Interactivity only arrives once the structure and layout are complete and stable. The reason is practical: JavaScript hooks into the markup, and any later markup change risks breaking logic that is already written. Here too, one component at a time:
- the mobile menu;
- the content slider;
- the effects on form submission or on scroll.
Before moving on: try each component you add, including a few “wrong” uses — double clicks, empty fields, resizing the window.
STEP 6 — Refactoring and cleanup
When everything works, change the AI's hat: from developer to reviewer. Ask for an analysis of the whole project as a newly arrived external senior would do it, with one explicit constraint: the behaviour must not change.
"Analyse the whole project as if you were a senior developer. Look for duplicated code, redundant CSS, unnecessary JavaScript and possible bugs, and propose a refactor that does not change the behaviour."Before moving on: commit before applying the refactor (that is Rule 2's parachute), then check that everything works exactly as it did.
STEP 7 — Optimisation
Only now, on a clean project, is it worth investing in polish: optimising earlier means shining up code that may well get thrown away.
- Cut redundant CSS and JavaScript.
- Optimise the loading of images and external resources.
- Check SEO, tag accessibility and how it responds on different screens.
STEP 8 — The final review: thinking about six months from now
The last pass is not hunting bugs: it is hunting weaknesses. Ask for a ruthless code review focused on maintainability, with questions that force the model to commit itself instead of paying you compliments:
"Do a full code review of the code and the project. Tell me:
- What you dislike about the current structure
- What you would change if you could start over
- Which parts could cause problems or bottlenecks in six months
- Where the code could be simplified further"
Not everything that comes up needs fixing immediately: some answers will become immediate work, others simply notes for later. What matters is that the weaknesses are known to you, not only to the code.

Every step produces a small result that you have read and approved before building on top of it. That is the difference between the pipeline and “build me the whole site”: at the end you do not just have a project that works, you have a project you understand. And when in six months you need to add a feature, you will be working on a tidy, modular base — not inside thousands of chaotic lines generated in one go, that nobody ever really answered for.
9. Reviewing the generated code: quality control stays yours
The decisive moment is not when the AI writes the code: it is when you decide whether that code deserves to enter the project. The review is where you genuinely take the wheel back — skipping it turns every suggestion into an act of faith.
For every change you receive, go through five aspects:
- Consistency: does it follow the style, names and structures already in the project?
- Boundary: did it change only what was needed, or did it touch areas nobody asked about?
- Behaviour: does it handle empty states, errors, edge cases and unexpected input?
- Maintainability: in a month's time, will you still understand why that solution exists?
- Verification: have you run tests, a build or manual checks proportionate to the change's risk?
And if something does not add up, do not ask for a generic “fix everything” — that is the fastest way to make things worse. Ask for a narrow diagnosis: which file is involved, what the likely cause is, which alternatives exist and which has least impact on the project. Then you choose.
10. Is it still worth learning to program today?
It is the question everyone asks themselves sooner or later, sitting in front of the screen: if a machine writes code for me, is there still any point studying scope, loops, asynchrony, databases and architecture?
The answer is yes — but the reason has changed. You no longer study to become someone who types code quickly: you already lost that race against a model. You study to understand problems, choose solutions, judge what gets generated and build systems that stay standing. In other words: you study to be the person who can say “this is fine” — or “this is not” — and mean it.
Three concrete reasons:
- Technological leverage: someone who can program and uses AI designs, integrates and ships at a speed that was unthinkable before. Less energy on mechanical writing means more energy on the product's value.
- Computational thinking: programming teaches you to break complex problems into clear, verifiable steps. Which is, literally, the same skill needed to steer an AI assistant well.
- Quality of intent: AI translates your intent into code. If the intent is weak, the code will be fragile however well it is written. Someone who understands systems, data, networks and constraints asks better — and gets better results out of exactly the same tool.
To paraphrase a much-quoted remark by Andrej Karpathy: English is becoming a programming language. But to use it well in software you still have to think like an engineer — know the systems, weigh the trade-offs and tell an elegant solution from a fragile shortcut.
11. What will a developer be doing in 3-5 years?
Nobody can predict the next few years precisely, but the direction is already legible: software development is shifting from typing code to designing systems, flows and decisions. Three trends in particular:
- Agents everywhere: you will not use a chat to have individual functions written; you will coordinate different tools handling analysis, implementation, testing, security and documentation. Your work will look more and more like directing, less and less like typing.
- More weight on taste and usefulness: when code becomes abundant and cheap, it stops being the bottleneck. The difference will be made by what you choose to build, how useful it is and how pleasant it is to use.
- Small teams with big leverage: one person, or a few, will be able to build products that today need whole teams, by combining AI, automation, templates and cloud infrastructure.
The future belongs neither to those who reject AI out of pride, nor to those who accept everything passively. It belongs to people who use powerful tools with clarity, taste and method — which is exactly the three things this guide has tried to build.
12. The daily checklist
At this point the theory has to become habit. This is the sequence to repeat on every AI-assisted change — seven moves that become automatic after a week:
- Save a clean state with Git before asking for significant changes;
- Always state the technologies, constraints and files involved;
- Define the expected result before generating the solution;
- Ask for changes that are small, verifiable and consistent with the task;
- Reread the generated code before integrating it;
- Try the change locally, with manual or automated tests;
- Format, clean up and commit only when the result is clear.
The principle behind the list is a single one: AI should take weight off you, not clarity. Leave it the repetitive slog, the first draft, the detailed analysis. Keep architecture, judgement, direction and final responsibility for yourself.
13. Where to go next
Using AI well requires solid foundations: the better you know the tools around the code, the better you can judge what the assistant proposes. The natural path after this guide runs through here:
- VS Code essentials: to work in an editor that is clean, tidy and genuinely yours — the base every AI extension rests on.
- Git without panic: to master the parachute this guide kept talking about, and experiment with AI without fear of breaking anything.
- All tutorials: to keep building practical foundations, one guide at a time.
14. Quick reference (cheat sheet)
The four blocks of a professional prompt, in a table to keep in view until they become automatic:
| Prompt block | What to write | Practical example |
|---|---|---|
| 1. Role / Identity | Give the AI a specific identity or expertise. | "Act as an expert front-end developer..." |
| 2. Context / Stack | Specify the technologies and the code style. | "The project uses HTML5, plain CSS, no frameworks..." |
| 3. Goal / Output | Describe exactly what it must produce. | "Write a JavaScript function to calculate..." |
| 4. Constraints / Limits | Define what it must NOT do, to avoid mistakes. | "Do not import external packages, use only ES6 methods..." |
15. Practical challenge: put yourself to the test
The best way to lock the method in is to use it straight away, on a small, real case:
Have the AI rewrite a messy JavaScript function, applying the whole cycle from this guide: a structured prompt, a critical reading of the result and verification against edge cases.
Step-by-step instructions:- Pick a somewhat convoluted JavaScript function — your own or one you found — that contains calculations or data transformations.
- Write the prompt following the full pattern: role, project stack, a targeted goal and at least one explicit constraint (for instance: return code only, with no prose explanation).
- When the answer arrives, do not paste it into the project: reread it line by line and check that it respects the logic you asked for and the constraints you set.
- Only at the end, test the function against 3 edge cases — negative numbers, empty strings, undefined values — and decide whether it deserves to be kept. That final judgement is the part of the challenge you cannot delegate.
16. Check what you have learned (quiz)
Test what you have learned in this guide with a quick 10-question multiple-choice quiz.